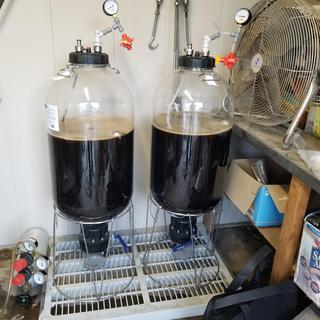
With the FermZilla Pressure Kit you can ferment under pressure, carbonate, and serve without ever needing to move your beer out of the fermenter. The kit inlcudes two stainless female threaded ball lock fittings with barbs, which thread onto the existing openings atop the FermZilla's lid. For the beverage out, you'll have a silicone dip tube with stainless steel float, allowing you to always draw from the clearest beer at the top of the tank. Pick up the Pressure Kit and turn your FermZilla into a true unitank!
The silicone dip tube is 31" long. It will work perfectly as is for the 55L FermZilla. For the 27L model we recommend cutting the dip tube shorter to remove unwanted slack.
With the optional Floating Dip Tube Filter, you can prevent hop material and other solids from ever entering the dip tube. Especially handy when you're pulling samples mid-fermentation!
Fermenting Under Pressure:
The pressure kit allows for fermenting under pressure, which will reduce esters and fusel alcohol production. This means you can ferment at warmer temperatures than you normally would, even making lagers at room temperature. Most commerical beer is fermented under pressure simply due to the size of commercial tanks and the pressure that is created by the column of beer. It is one of the distinct differences between homebrewing and brewing on a commercial scale. The FermZilla's lid already comes with a built-in pressure relief valve that will blow at 35 psi; the pressure kit simply allows you to add CO2 through the ball lock fitting. We strongly recommend that you also purchase an adjustable pressure relief valve, or spunding valve, which allows you to set a lower pressure. It's always a good idea to have two relief valves on the FermZilla anytime the unit is under pressure.
Carbonating, Transferring, and Serving:
When you are fermenting under pressure the beer is already carbonated when you are done fermenting. You can control the level of carbonation by using a spunding valve. This means you can eliminate kegging and serve directly from the fermenter. We love this idea but there will probably still be times that you want to keg. Attach a beer line from the FermZilla's bev out to your keg and enjoy the easiest kegging experience ever. You can also choose to send carbonated beer through a beer filter on the way to your keg. When applying pressure with a CO2 tank also make sure that you have a functional relief valve on your CO2 regulator.
Eliminate Oxidation:
Since the beer always has a CO2 blanket through fermentation and during any transfers out, oxidation is eliminated. When you cold crash you won't be sucking air back in through an airlock.
Key Features:
-
Ferment beer under pressure to reduce ester and fusel alcohol production
-
Always draw clear beer with the floating dip tube
-
Keg beer that has already been carbonated
-
Use CO2 to push beer into a keg or through a filter into a keg
-
Eliminate kegging altogether by carbonating and serving directly from the FermZilla
Please note: pressure kit does not include the lid pictured in the example photo. The ball locks and floating dip tube are installed on the FermZilla's existing lid.

