By Jeffrey Pugh (Brewing Techniques)

This home brewery has a small footprint, gives you a great deal of control over mash temperature, and makes brewing convenient.
I have been a home brewer since 1992 and enjoy combining my technical abilities with the science of brewing. I welded for an engineering firm in Spokane for several years, but now I operate a milling machine and work closely with designers. In three years of rewarding but frustrating all-grain brewing, I have observed the difficulties of creating great brews consistently. I decided to design and build a small, self-contained, semi-automated brewery. A craft brewer friend of mine remarked that he could use a similar set-up to serve as a pilot brewery for designing test batches and analyzing different brewing procedures. I just hoped at the time to fill my fridge with great beer.
It took two months to design the system and two days to build the frame. The rest was assembled as I could afford parts, which took another couple of months. I like the stacked design as opposed to a stair-step configuration because it uses less material and takes up less space. The system reduces the length of the brew day from more than eight hours to five or six, including cleanup. I have perfect control over the process temperatures, and a great beer is easily reproducible. The best part of the whole thing is the finished product.
I wanted the system to:
Click here to browse our three-tier BrewSculptures!
Frame: The frame is 82 in. tall and has a 36 in. X 36 in. base equipped with leveling screws. The steel frame is made of 2 in. X 2 in. X 3/16 in. angle iron welded and bolted together and painted with epoxy paint. I spent less than $ 60 on materials. The structural members can be cut by your steel vendor or by renting a chopsaw for a half day, and the smaller lengths of steel needed can be found in remnant racks and purchased inexpensively by the pound. The frame is fabricated as a series of three subassemblies (upright, base, and gussets) and is very simple and straightforward. The basic framework can be welded together with a stick or wire-feed welder in a couple of afternoons.
The frame is collapsible, designed to come apart in such a manner that it will fit in any room, or down any basement stairs, and be easily portable by one person. When the frame is disassembled, the wiring harness, enclosure, and plumbing stay with the upper frame assembly. The design is so strong and stable that I can sit on the mash tun without it tipping (see photo). Even when the vessels are full of water, the frame is extremely solid.
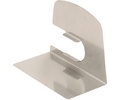
Vessels: The system includes three removable stainless steel vessels adapted from Sankey-type kegs, each with its own remote temperature sensor and panel-mounted gauge. The vessels are bolted to the frame with a ½-in. stud and nut, an arrangement that is strong and makes the vessel removable. Kegs are the ideal container for brewing beer, but remember that diverting kegs from a wholesaler or retailer by forfeiting the deposit is stealing. Make sure you are getting your kegs from a salvage yard or other reputable source of used kegs, and it’s a good idea to keep your receipt for them.
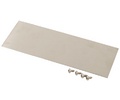
The mash tun has a false bottom made of stainless sheet metal perforated with ⅛-in. diameter holes punched on 3/16 in. centers. It is cut into a 15¼-in. circle and sits on the lip near the bottom of the keg. A 3-in. stand-off pin bolted to the center of the screen rests on the floor of the keg to keep the screen from getting pressed to the bottom of the keg by the weight of the mash and the suction of the water running out. The screen was purchased at a local specialty metal shop; I cut it to size with aviation shears.
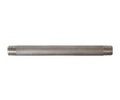
The three temperature gauges are brand new surplus items with a 60–220 °F (16–104 °C) range. The gauges have 2½-in. dials. The sensors, mounted at the end of 56-in. capillary tubes, thread to a standard ½-in. NPT half coupling welded to the side of the keg. The gauges can be calibrated.
.jpg)
The hot liquor tank and mash tun are insulated with a Mylar insulating pad cut to fit. These pads are available from any hardware store. I remove the Mylar whenever the burners are ignited to prevent a meltdown! It’s a little inconvenient, but the alternatives are very expensive, and these wraps are very easy to add and remove.
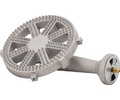
Mash mixer: An assembly of rakes and plows powered by a geared motor carefully stirs the mash and helps maintain an even temperature.
The motor is a 1.1-amp, 62-rpm, 30-in./lb gear motor bolted to the middle of an aluminum lid. The lid sits on two small locating pins welded to the top of the keg. The rakes and plows are attached to a 16-in. shaft coming out of the motor. It is wired with SO (stranded, oil-resistant) cord and plugs in using a Molex (automotive-style) connector that tuns to a switch in the enclosure. The whole assembly can be removed from the keg in less than 10 seconds.
The rakes and plows are made of machined and welded stainless steel. The assembly is strong and works well, but it turned out to be much more difficult to build than I had planned. Building it could have been greatly simplified if I had used an aluminum shaft and food-grade nylon paddles.
The design of the rakes and plows is unnecessarily complex because I did not know the motor’s capacity. What I wanted was a tool that not only broke up dough balls and stirred the mash without aeration but also circulated it so that temperature boosts did not scorch the bottom of the tun. I also wanted the circulator assembly to pull itself down to the bottom of the vessel instead of pushing itself off the locating pins and causing chaos. Because I did not know how much torque the motor would take before it stalled, I made the plows with adjustable pitch and experimented with it before brewing for the first time. The blades are now at 45°, and the only way the motor will stall is if I forget to add water. Now that I know the capability of the motor, the design could be drastically simplified.
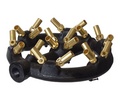
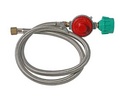
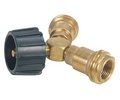
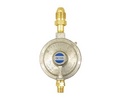
Burners: Each vessel is equipped with an individually controlled liquid propane gas (LPG) burner with electronic ignition. The burners are mounted 6 in. under each vessel and are plumbed to a manifold that contains individual control valves. Parts for the manifold and valve setup are readily available at any hardware store. The burners came from a local homebrew shop and produce about 80,000 Btu.
The electronic igniter is a surplus item from a furnace and is bolted on top of the wiring enclosure. The flame is lit by simply opening the gas valve to the desired burner and flipping the switch. The spark instantly ignites the gas.
.jpg)
Pump: A 110-V magnetic drive sealless pump moves chilled wort to the fermentor and can run chemicals through my bottle washer. The pump is a used surplus item from a GE X-ray machine. The housing is stainless, the impeller is polypropylene, and the motor and pump are coupled by two magnets so that there are no seals. The pump operates at temperatures as high as 190 °F (88 °C), and flow can be turned down without damage. Remember that this pump is not self-priming and there must be liquid in the line to initiate flow. It also doesn’t like leaks in the line or at joints — if it sucks air in, it will let you know by cavitating noisily. Don’t run it dry either, as the impeller has a ceramic shaft and will scream like your little sister.
Control panel: Wiring terminations, motor capacitor, gauges, fuses, and switches are mounted in a weathertight stainless steel enclosure (see box, “Assembling the Wiring Harness and Enclosure,”). I purchased the enclosure used at a salvage yard for $15, but an identical standard steel enclosure is available for $8.99 brand new from the surplus store where I got many of my other parts.
.jpg)
I fill the top hot liquor tank with 13 gallons of water, start the heater, and bring the water to 170 °F (76.5 °C).
I open the ball valve to allow just enough hot water to cover the false bottom. Then, with the mash mixer and water running, I start adding grist. The only way to stall the gear motor is to forget to add water; it will easily distribute and mix more than 30 lb of malt with no dough balls and no hot spots. I usually prefer a single-infusion mash for its simplicity, but boosting temperatures for a step mash is no problem. It will bring mash temperatures from 122 °F (50 °C) to 154 °F (68 °C) in less than 10 minutes.
Now I wrap the insulating jacket around the vessels and wait for the enzymes to do their thing. I will occasionally boost the mash temperature with the mixer running to prevent scalding. The remote thermometers react instantly, even with the long capillary tube. Meanwhile, sparge water (in the hot liquor tank) is maintained at 170 °F (77 °C).
After mashing, I remove the mash circulator and batch sparge (running off wort in three separate batches, stirring and recirculating cloudy runoff between batches). I batch sparge because of its simplicity and because trying to synchronize hot liquor inflow and outflow is tedious. I am working on a sparge arm that folds out of the way, but it’s not finished yet.
The kettle burner can be fired up as soon as there is 3 in. of liquid on the bottom. By the time I’m done sparging, part of the extract has been boiling for half an hour. I then add hops and chill with an immersion chiller. Now I can feed the wort by gravity into two 5-gallon fermentors or pump it back up to the (now sanitized) mash tun and use that as a primary fermentor.
Cleanup is relatively easy because everything comes apart quickly and the whole machine can be hosed down after it is unplugged.
I’ve confirmed that although it’s the brewer who makes the beer, not the equipment, temperature and process controls are critical to making reproducible products. With 24 batches of consistently good-quality beer now under my belt, I confess that I am completely spoiled by my system. A tinkerer never rests, however, and I have been plotting several improvements to the design. For one thing, as attractive as the frame is, it could be a little shorter to allow for wheels and brakes so I could roll the whole setup out of the way when I’m done brewing. The sparge arm is in the works. I’m also considering using 110-V water heating elements for heating the mash tun and hot liquor tank and controlling the temperature electronically, or, as my friend Troy, a robotics technician, suggests, wiring a numeric controller to automate the whole thing. With a little knowledge, ingenuity, and patience, you too could have a brewery that other home brewers — and maybe even some professional brewers — dream about.
All contents copyright 2024 by MoreFlavor Inc. All rights reserved. No part of this document or the related files may be reproduced or transmitted in any form, by any means (electronic, photocopying, recording, or otherwise) without the prior written permission of the publisher.


.png)
.png)
(1).png)
.png)