by Paul Zocco (Brewing Techniques)

Any brewer who’s outgrown his or her conventional 5-gallon brewery knows how easily the heart inclines toward a mightier, more efficient setup. Enter the half-barrel brewery: All the best in dedicated home brewing and adult tinkery.
If you are a serious all-grain or partial-grain home brewer and are spending too much time setting up equipment and cleaning up afterwards, then it’s probably time to build a better mousetrap. A kitchen-free brewing system is what you need to make your life easier. You will be able to brew a double or triple batch without expending any more effort than you would to brew a single 5-gal batch.
I built a half-barrel three-tiered brewery using commonly found items. My costs were a fraction of those charged for similar professionally built systems. Of course, I did not figure in the time spent on labor, but this project was a labor of love.
Anyone interested in embarking on a similar project must first and foremost be a tinkerer. Building this system requires little more than nuts, bolts, some hand tools, and some resourcefulness in finding the extra parts needed. Flea markets, junk shops, or possibly your own garage or basement are great places to start.
You will encounter some specialized jobs that require professional skills, such as the cutting and welding of the stainless steel kegs, but most other jobs can be done at home if you have some basic design and fabrication skills. Get to know a dependable welder and plumber; their experience will save you a lot of grief, time, and money.
The box below shows the list of materials that went into my system. The quantity and cost of materials will vary depending on the size and configuration of your setup; mine had to fit under a conventional 6-ft, 8-inch doorway. Its overall measurements are 2 ft wide, 4 ft long and about 6 ft, 6 inches high. A four-tiered system with a fermentor at the lowest level is only possible if it clears the doorway or ceiling heights. If it works, you will not have to pump chilled wort into a fermentor; simple gravity will work just fine.
Many possible combinations can be made on a basic theme. You may want to have a two-tiered system in which hot liquor is pumped up to a mash tun and gravity-fed through the chilling stage before ultimately being transferred to your fermentor.
Welding projects: I found a welder who was experienced with stainless steel and instructed him to cut 12-inch diameter openings on top of all three kegs. A plasma arc cutter makes the neatest cut and requires the least grinding to smooth the resulting slag. Your openings should be ground smooth to prevent any injuries. While he’s at it, the welder can also weld the couplings onto the sides of the kegs that could accommodate ball valves, sight-tubes, and thermometer access. If you can figure out a plumbing plan on your own, all other jobs can be done yourself.
The frame: The frame to support this whole system must be overbuilt to hold extreme weights. A keg with 10 or 15 gallons of strike water, along with 15 or 20 lb of grain (or more, as in a barley-wine or strong Belgian) in a mash keg, and the combined weight of the system components may weigh (at least) 200 lb. The extra effort at this stage is very important. You don’t want 10 or 15 gallons of hot liquid or boiling wort to spill all over the floor or on you if your frame collapses.
Old steel bed frames work very well for this purpose, but you have to drill a lot of connecting holes. I used Unistrut-type framing from the local hardware store, which already has the holes drilled. My frame uses nuts and bolts, but welding equipment would make assembly much easier.
I fitted the frame with small casters to make it portable, but if you have a well-ventilated corner in your garage, you could build the system as a permanent fixture. All you would need is electric power and a nearby water supply.
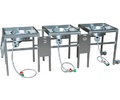
Burners: After a suitable frame has been built, it’s time to position your propane burners. You’ll need one each for your hot liquor, mash tun, and boiling kettle. My system uses the Cajun Cooker 170,000-Btu burner. I recommend this size for the speed with which it starts a boil. The mash tun burner will never be used to its maximum heating capability, which would result in a scorched mash, but for uniformity I used a 170,000-Btu casting also. Try to keep the gas pressure high enough to prevent a sooty, high CO2-emitting flame. The manufacturer, Metal Fusion (Kenner, Louisiana), will sell you just the burner castings if that’s all you want. They also sell the accompanying hose, valves, and fittings. The same manufacturer sells tripod stands that you can attach to your burner. Tripods come in different heights, and the keg will fit on top. When mounting your burner castings, allow about 6 inches of distance between the casting and the bottom of the keg you are trying to heat. Heat efficiency will be lost if it is either too close or too far away. I attached my burners to ¼ – 20-in. threaded steel rods that could be slid up or down, effectively allowing me to tune in my flame and heat most efficiently.
Safty issues. However you choose to configure your barrels, make sure that the flame of the burners are a safe distance from the propane supply lines. I had a near accident brewing my first batch on my new system. The heat from the boiler burner started to blister its own gas line. I was lucky to see this happen and was able to catch it before it burned completely through, thereby preventing a serious accident. Subsequently, I fabricated a protective heat shield that completely surrounds the burner casting. If you can disassemble the ends of your fuel line, I recommend covering them with a heat shield (heat-retardant pipe insulation) too.
Working with gas is always potentially dangerous; similarly, water and electricity don’t mix. Reflected heat from burners or a splash of sparge water or hot wort near a live electric wire can quickly create unsafe conditions. Use every possible safety precaution.
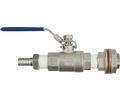
Plumbing: Once you have your kegs placed atop a heat source, the next step is to plumb in the whole thing. All valves, pipes, and fittings must be made of brass or stainless steel. All three barrels will need one exit ball valve each. My system uses ¾-inch NPT sizes, but one ⅜- or ½-inch NPT is fine also. See the diagram and photograph for ball valve and pipe configurations.
Hot liquor tanks: When positioning your kegs, the highest one will be for the hot liquor tank that heats strike and sparge water. The temperature on the surface of the water may vary as much as 10–15 °F from the bottom, so I use a mixer to keep the water temperature even. It consists of a small AC motor with a small plastic paddle attached on a stainless steel rod, immersed halfway down in the tank.
Mashing and temperature control: I monitor my mash temperature with a long probed bimetal thermometer mounted into a stainless steel coupling that is welded about one-third of the way up from the bottom of the keg. I’ve fabricated a mash jacket using heat-retardant hot air ducting wrap; this insulates the mash tun enough so it does not drop more than 3 or 4 °F in an hour-long mash. My mash mixer also helps with temperature control, as well as helping ensure all of the grain is wetted. The mixer is a high-torque, slow-revolution electric motor that is fitted with a paddle and submerged in the mash.
False bottoms: I use a couple of commercially made false bottoms that fit very nicely inside Sankey kegs. These come with a ½-inch i.d. stainless steel elbowed tube, which I’ve adapted to a ¾-inch pipe size for use in the boiler. After a little drilling to open up the hole in the false bottom, I was also able to adapt it to fit ¾-inch NPT pipe. I’d tried designing my own false bottom, by drilling a zillion holes in a stainless steel sheet metal disk, but grain always found a way through. The same thing happened in the boiler; whole hop pieces found their way through to plug up the exit pipe or pump system. I had much better luck with the commercial product, but if you can build your own better than I did, more power to you.
|
Materials List for a Three-Tier Brewery |
|
Approximate Needs Material Quantity Cost
*As needed. |
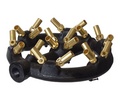
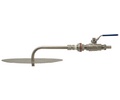
Lautering/sparging: A commercially available spinning-type sparge arm can also be fitted at the outlet valve. The head pressure of the sparge water in the hot liquor tank will keep the arm spinning, allowing an even dispersal of water into your mash tun (it’s also possible to use a shower head). You can adjust the flow of sparge water going into the mash to match the flow of wort going into your boiler. Ball valves do this very nicely and allow a very slow sparge. My system is fitted with a boat bilge pump that is set up as a recirculating system (RIMS). I recirculate my mash liquids during my entire sparge cycle, creating a very clear wort for the boiler. A hose attached to the spigot of the mash ball valve prevents splashing and aeration of the wort when transferring from the mash tun to the boiler. This hose should go right to the bottom of the boiler.
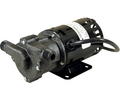
Pumps: You can purchase commercial pumps to transfer wort from the boiler to your fermentor. The pump housing and impeller should be made for food-grade applications and be able to withstand hot liquids. The drive is best if it is of a magnetically coupled design. This item will be your biggest expense. Invest in a good one; you will be glad you did later on.
Wort chilling: My system uses a 50-ft coil of ½-inch copper plumbing tubing. It has conventional garden hose–sized fittings soldered to the ends for convenience.
An approximate cost for materials is around $ 750, which does not include labor costs for welding and cutting (another $ 50–75). That might sound pricey, but it’s far cheaper than similar commercial systems. I saved a few bucks by trading some of my precious homebrews for labor, and if you’re resourceful, you might be able to save even more than I did. You could also cut costs by omitting sight tubes, double propane tanks, and other optional items. It’s your decision. Happy brewing!
*NOTE* Pricing in this article is most likely dated, as the article was originally published in 1998. Pricing has most likely increased since then.
All contents copyright 2024 by MoreFlavor Inc. All rights reserved. No part of this document or the related files may be reproduced or transmitted in any form, by any means (electronic, photocopying, recording, or otherwise) without the prior written permission of the publisher.


.png)
.png)
(1).png)
.png)