“It takes a lot of great beer to make great wine!”
When I offer friends some homemade wine, their reactions are rather typical. At first, I can see that they want to show their affection for me by validating how cool it is that I make my own wine. But I can also sense some other latent discomfort as they imagine what it is likely to taste like. I mean, “home made wine,” how good could it be? I involuntarily wince at the memory of my uncle’s elderberry wine. My friend’s father made a summer lemon wine … and although it was thirst quenching, I think the only reason I drank it was because it was free. But what is really gratifying is their reaction after their first taste of my wine. “You made this?!?” Or, “This is really good!” Their expression is full of surprise, relief, and a dawning curiosity. Suddenly, they want to know how I did it.
The good news is that if you have the skills and equipment to make beer, you can make awesome wine from a kit. Really! With premium kits you can make wine that literally will compete with bottles you need to spend upwards of 20 to 30 dollars for. Making wine from a kit is far easier than making beer. And the results will amaze you and your friends alike!
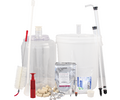
Making good beer is about having good sanitation, fresh ingredients, and a good process. Making good wine is similar, but with wine, the quality of juice is a major factor in what you can create. That’s why using a good kit will put you in a different league than someone that makes wine from grocery store or home-grown components. Good kits use good juice, from high quality grapes grown for wine making. Below I will outline equipment and the basic steps involved in making a typical wine kit.
When you make beer, you must boil your wort. Generally, you will have hop additions while it boils, and then you will need to cool your wort in order to make it ready to pitch the yeast.
With a wine kit, you will simply add the grape juice directly to your primary fermenter and top it off with good quality water. Take a gravity reading with your Hydrometer and then pitch the yeast. Sound simple? It is. It takes me less than 15 minutes (including sanitation time) to put up a batch of wine. For many wine kits you will add included oak at this stage. Advanced kits will also have grape skin additions at this point.
Primary wine fermentation takes about 2 weeks. Once your gravity readings stop, your fermentation is complete, and you will rack your wine off the lees and into the clean secondary fermenter.
After moving the wine to the secondary, there are two things you do here that you don’t do when brewing beer. First, you will add some Potassium Metabisulphite to the wine. This step renders the yeast inactive and creates an environment that prevents the wine from oxidation and spoilage.
Second, you will need to degas the wine. Basically, you want to knock the CO2 out of the solution that has been dissolved into it during fermentation. Leaving the CO2 in the wine can lead to negative flavors or attributes in the wine. Also, it could impair its ability to clear completely. Degassing involves stirring vigorously or using a drill to splash it around a bit. It’s not complicated.
Next, you will add some clearing/fining agents to help with clarification. Then let it sit and bulk age in the carboy for a bit.
Finally, after sitting in the secondary for 4-6 weeks for white wine and for 6 months or longer for a red, it’s time to bottle. No priming sugar; just fill and cork.
Wine, another beverage to inspire your creativity
Over the past 15 years I have tried many wine kits and have, for the most part, been impressed at what one can do at home. Most kits have good, easy to follow instructions. As a home brewer, you have already dealt with a variety of things like sanitation, yeast, racking, and bottling -- several things that might confront the complete novice.
With experience you can learn to “doctor up” your kits. In other words, once you get comfortable making wine as prescribed, you can branch off and adjust for different mouthfeel, ABV, structures, tannins, and pretty much anything you want.
It’s fun, easy, and you will surprise the heck out of yourself at how good the wine is that you make so easily.
All contents copyright 2024 by MoreFlavor Inc. All rights reserved. No part of this document or the related files may be reproduced or transmitted in any form, by any means (electronic, photocopying, recording, or otherwise) without the prior written permission of the publisher.

.png)


.png)
.png)
(1).png)
.png)