Making a yeast starter is one of the easiest ways you can increase the quality of your homebrew. And if you have your yeast shipped to you, it's going to arrive to you warm, even if you had it shipped with an ice pack! The best way to not only ensure the viability of your yeast but to actually increase it is to make a yeast starter. Vito walks you through the easy process of making a yeast starter, and tells you why he, as a homebrewer for 15 years, always makes a starter...because it always makes better beer!
Hey, guys. Vito, for MoreBeer! here today, we're going to be making a yeast starter, so we're going to go over how to make one and why it's important. Hey, before we get started, if you like the content, be sure to subscribe. We've always got new stuff coming out, so make sure you subscribe to get those notifications.
All right, so I ordered yeast. I got it in the mail today. Go to open it up. You know, my my ice pack is melted. Question is, is my yeast still good? Yes, it is. Yeast is resilient. The ice pack is always going to be melted. It's only going to last for, you know, six, 7 hours. Pops in the mail, took two days to get to me.
Yeast is still good. It's viable. Yeast is super resilient. We use the ice pack just to kind of keep a better environment and buffer the time. But we're going to go ahead and make a yeast starter to let us know that this is good and it's also going to make better beer overall.
So even if I went to the home brew shop and picked this up and brought it home cold, I would still make a starter that's just you're going to make better beer. Traditionally, you'd make a starter if you're making lagers or bigger beers.
But in my process, what I found was making a starter led to better beer every time. So essentially what we're doing is a mini ferment for our yeast. So we're going to have our yeast, we have demi dried malt extract and we also have yeast nutrient.
So we're going to essentially do a ferment prior to our main fermentation. It's going to allow the yeast to reproduce. So we're going to have more yeast. We're also going have more viable yeast because going to be healthy, they were just, you know, created.
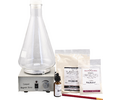
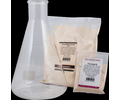
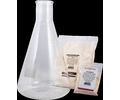
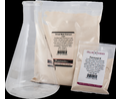
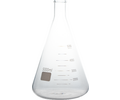
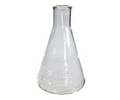
Now I'm going to show you the process on how to make a starter. Let's do it. So today we're going to be using our yeast starter kit for 1000 ML batch size includes the 1000 milliliter or Lumiere flask, a half pound of light DME and one ounce of Fermaid K, a.k.a. yeast nutrient.
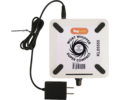
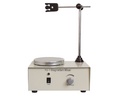
We're also going to be using a stir plate today. It basically essentially mixes up the solution, keeps the yeast up in the liquid, also introduces oxygen along the way. In order for yeast to reproduce, they need oxygen. So, you know, so by shaking it and constantly stirring it, we're agitating it and introducing more oxygen.
So it's going to lead to more reproduction of yeast cells. You don't need a stir plate, but it you know, instead of you shaking it every hour or every 10 minutes, it does that job for you. It's you know, it's what they use in labs and it is the way to go.
So what we have inside the stir plate or on the stir plate is what they call a stir bar. It's essentially a little food grade magnetic piece that spins from the bottom and creates that whirlpool that's going to be bringing the top down into the bottom and agitating the entire solution through the entire starter process.
Yeah, you turn it on so you could speed it up. It's variable speed so you can go as fast or as slow as you want. Just a reminder, we want to make our yeast starter at least 20 for if not 48 hours before we plan to make our batch of beer.
Let's talk about where we want to do this. You know, obviously, we're using we're in our kitchen because we're we're using our burner, but we want it to be a sterile environment. So make sure you're spraying everything down with sanitizer.
You know, keep any other bacteria away from our yeast starter. We want our yeast to be the only solution that reproduces in that yeast starter. All right. So let's go through the steps for making it easy starter. So first thing we're going to do, we're take our yeast out of the refrigerator, get it, make sure it's warmed
up to room temperature. All right, step two, we're going to boil some water and mix in our DME solution in the instructions it says to do it in your Urla meyer flask. What I found is it's a little safer to do it in a pot reason being, you know, just like your brew day, you might have a
boil over that early. Erlenmeyer Flask has a smaller lid or opening at the top, and if you get a boil over that, it could cause a volcano, which could be dangerous. Also, when you're going from hot to cold, you know they're not supposed to crack, but that could happen.
So I just I find it safer. And that's my recommendation. So we're going to boil the solution for about ten, 15 minutes. All we're trying to do is is, you know, kind of heat up the DME, mix it into solution, get it ready for the next step.
Since we boiled our solution in a pot, we're going to need to transfer it into our flask. You know, obviously make sure everything's sanitized at this point and they're going to cool it down. You could do an ice bath.
You could pop it in the fridge or the freezer. We're just trying to cool it down to pitching temperatures, make sure we cover it, spray everything down with sanitizer and let it sit for 10 to 15, 20 minutes.
Just make sure that it's cool to the touch. No. No. All right. Once our starter solution is ready to pitch the yeast, we're going to open up the yeast packet. Pour it into the flask and cover it back up with aluminum foil and.
Now we're going to place it somewhere warm and swirl it as often as possible. We have our magnetic stirrer plate, so we're going to go ahead and do that. That's going to lead to maximum cell growth. Then we'll wait at least 12 to 24 hours and pitch our yeast.
I've been brewing for 15 years now. I always make a starter every time if I have the time. If not, you know, I'd buy X amount of packets, but it's just you're going to have a more yeast, more viable yeast.
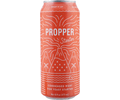
It's going to make better beer in the end. All right. You've seen how to make a starter for years. That's how I did it. But now there's a new product that actually makes it easier, proper starter. It's condensed water, essentially.
Is the demi your yeast nutrient all in one ready to go? You just add a little water, add your yeast and it's ready to go. It cuts down the process. All right. That's it. Super easy by boom, bada bing.
It's ready to go. We're going to be brewing with this this weekend. So if you've got any comments or questions, listen below. We'll get back to you. Thanks for watching. Cheers, all.
All contents copyright 2024 by MoreFlavor Inc. All rights reserved. No part of this document or the related files may be reproduced or transmitted in any form, by any means (electronic, photocopying, recording, or otherwise) without the prior written permission of the publisher.


.png)
.png)
(1).png)
.png)