 Download print friendly version
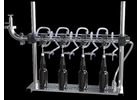
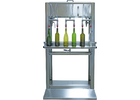
These instructions are made for our WE602 and WE610 bottle fillers
Step One:
The filler is designed to be fed by gravity, siphon or pump through the ½" inlet on the rear upper right of the reservoir. This inlet tube runs open into the filler’s reservoir, where the rising level of wine pushes the stainless float up. When the reservoir is full the float’s position seats the rubber ball on the float arm over the inlet tube, stopping flow. Regardless of the feed mechanism you’re using (pump, gravity or siphon) care should be taken to ensure that the force of the liquid coming into the reservoir is not strong enough to overpower the float-seal mechanism (i.e: feeding by gravity from 20' above or something similar to this effect). If this is unavoidable a ball valve should be installed on the feed line so that flow can be effectively cut off. Either way, it is advised that you test the scenario with water before beginning to work with your wine.
Step Two:
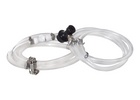
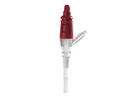
Once you have your inlet / feed system set up you are ready to prime the fill heads and begin filling bottles. The filler works on the principle of a siphon, and so the heads need to be started. Included with the filler will have been a rubber siphon bulb with a small piece of tubing and a rubber foot attached to it. To prime the fill heads: with one hand, squeeze the bulb of the siphon starter and use the other hand to fit the rubber foot over the opening on the end of the nozzle. Push down on the nozzle to pull the inside gasket off the front wall of the reservoir and begin slowly releasing your squeeze on the bulb, which will draw wine into the nozzle. Once wine begins to flow from the nozzle, release your downward pressure on the nozzle which will re-seal the inside gasket against the wall of the reservoir. Your fill head is now primed. Repeat the procedure with each additional head.
Step Three:
Now you are ready to begin filling bottles. The most important thing to remember here is that there is no automatic stop mechanism here, so you will need to take care to pull the bottle when it is filled to the proper level. The clasps around each fill head will hold the bottles in place during filling, so feel free to use them. Do be prepared to have to re-prime the nozzles periodically during the filling process, as they will break their siphon from time to time.
Step Four:
When you have finished bottling your wine, the filler should be cleaned immediately with hot water. This should be sufficient, but if you wish a cleaning detergent like PBW (CL25A) can be used, so long as the filler is rinsed thoroughly afterwards. As with all things stainless, avoid prolonged exposure to PBW as well as any exposure to chlorine or chlorine-based products - this means NO BLEACH. Allow the filler and lines to air-dry after cleaning and store until next year.
Replacement nozzle gaskets, float assemblies and siphon starters are available for purchase through MoreWine!


.png)
.png)
(1).png)
.png)