 Download print friendly version
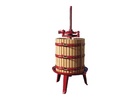
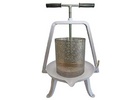
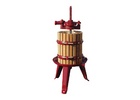
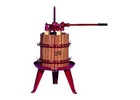
Congratulations on the purchase of your new MoreWine! Basket Press! You’ll be pleased to know that your new equipment was finely crafted in Europe to provide you with a tradtional-style press at a great value. This ratchet-style press has been used by generations of winemakers from farm production up through full scale commercial operations. Many wineries today still use a basket press for their annual production.
Setting Up:
The basket press is a fairly simple piece of equipment to use, even for the first time. Prior to actually pressing it is important to sanitize any parts which may come in contact with the wine as it makes its way through the press. This pretty much means everything but the legs. You can skip the 2x2” blocks that will be inserted between the ratchet assembly and the half-circle wooden caps which will ensure even distribution of the force of the press on top of your must, but the caps themselves definitely need to be sanitized. You may find it helpful to have one or two large pieces of plastic tarping out on the ground where you can place both clean and dirty press parts without making a mess or de-sanitizing them. Assemble all your supplies so that you have clean and sanitized carboys, tanks or barrels ready to receive the pressed wine and be sure that you have a way to get the newly filled vessels into their proper cellar location.
Step One:
Once the press is sanitized, it is time to get to work. A small, 1 or 2 gallon bucket is the easiest way to transfer the wine from your fermenter into the press - be sure that it and your hands and forearms are sanitized as well (this is one reason that MoreWine! prefers StarSan (
CL26) to strong sulfite solution for sanitizing). Place the two halves of the basket itself onto the base of the press and lock them in position with the provided pins.
Step Two:
Next, fill the basket of the press about 2/3 full with must. *Note: If you’re making red wine, it’s very important that your wine be finished with alcoholic fermentation prior to pressing. Wine with residual sugar content at this point is a prime candidate for infection by bacteria or, even worse, wild yeast which can produce any of a number of off flavors as they convert the remaining sugar to alcohol. Even if you do not pick up a microbial infection, the renewed oxygen contact which occurs as the wine runs down the outside of the press can cause your cultured yeast to stop alcoholic fermentation and try to reproduce again until this oxygen is consumed.*
Step Three:
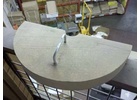
Once the basket is full of finished must, place the halfcircle caps on top of the must as shown below, following the caps with the 2x2” blocks. Next, physically thread the ratchet assembly down the main shaft of the press until it is just above the top of the two 2x2” blocks and aligned such that the ratchet assembly will sit squarely on the blocks. If possible, it is best to be applying a very slight amount of pressure to the must at the end of this step, as the friction will help hold all the pieces in place when you begin working the ratchet assembly.
Step Four:
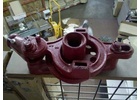
Now you want to install the ratchet keys into the ratchet assembly. This is a key part of the process, as in one orientation the keys will drive the head assembly downward and in the other position they will move it upward to relieve the pressure when you are done pressing this lot. Below you will see the orientations for the two directions of movement.
Step Five:
Once the head and keys are installed, you’re ready to install the handle to the press and begin making the magic happen. Work the ratchet until you see wine flowing out of the bottom of the basket and into the trough (this shouldn’t take much pressure), and then continue until you start to feel an increase in pressure from the grapes “pushing back.” You will want to have a glass on hand to sample this “press run” of wine while you are working. Discontinue the press for this lot as soon as you taste an increase in bitterness in the wine coming out of the trough or if it becomes a situation where you are really cranking on the press. This is because at the end of the press you are extracting harsh seed tannins by physically crushing the seeds, and this will carry over into the finished wine rather than aging out.
Step Six:
Now simply reverse the keys and back the head assembly off of the blocks a little bit until you can remove the handle and unscrew the ratchet assembly. It is a good idea to move the tarp (or whatever you’ll be collecting the spent grape solids - called pomace - in) under the press area at this point. Remove the blocks and half-circle caps, then the basket itself and remove the remaining solids. Hose off and re-sanitize the press - you can never be too clean - and continue to the next lot.
Some notes on pressing Reds vs. Whites:
Reds:
Red wines are generally fermented in contact with the skins and seeds in order to extract both color and tannic structure from these parts of the grape. Red wines should be fermented to dryness before pressing due to the risks involved with pressing a still-fermenting wine. If the wine is not going to be put through a Malolactic Fermentation, then it is appropriate to go ahead and bump up your SO2 levels prior to putting the finished must through the press.
Whites:
White wines are generally pressed just after crushing or without crushing them at all, and prior to the onset of fermentation. The yield from the press is actually still grape juice, and referred to as must. It is definitely appropriate to make a standard SO2 addition to the crushed white grapes prior to pressing or to the must that you get from pressing whole berries. Also, if you plan on processing the grapes through a destemmer only or a crusher/destemmer with the rollers set all the way open, you’ll wind up needing to re-incorporate about 20% of the stem matter in with the grapes themselves prior to pressing to ensure that all the liquid is able to run out of the pomace.


.png)
.png)
(1).png)
.png)