by Kirk R. Fleming (Brewing Techniques)
.jpg)
The benefits of convenience and control far outweigh the cost of setting up a home draft system. This article shows how easy it can be to keg at home.
Sooner or later you’ll meet a brewer who shares with you the joy of homebrewed draft beer. Drawing a glass of fresh ale or well-aged lager from the keg has an appeal that somehow goes beyond mere words. After you’ve seen for yourself how much fun (and how cool) draft-at-home can be, you’ll probably be on your way to the store to get set up. In fact, you may have just received a draft system during the holidays and are wondering how to use it.
Understanding the benefits, costs, and special considerations involved in kegging will help you make better choices when it comes time to set yours up. This column describes what you’ll be getting into, and what you’ll get out of the whole experience.
First off, kegging is all about convenience and control. Convenience, because you can forget about cleaning and sanitizing bottles, storing empties, and waiting weeks for beer to condition in the bottle. Control, because you’ll be able to easily adjust carbonation levels to your liking for a given style or batch. A home draft system also opens the door to other possibilities, like closed beer transfer and filtering for crystal clear beer.
Of course, all these benefits have some cost, depending on the type of draft setup you choose. The cost of the basic equipment itself can be relatively high (though it will pay for itself many times over in convenience).
Storage and refrigeration of kegs is another concern. Kegs come in a variety of sizes, including convenient 5-L minikegs. While the smaller kegs fit neatly into any refrigerator, larger kegs are a bit bulky and place demands on storage locations, transportation, and cooling needs. A dedicated beer storage refrigerator is almost a requirement, and it takes a fairly sizable fridge to store more than a couple of kegs. Other options are available for getting cold beer from a keg (jockey boxes, for example), and many brewers get by just fine without dedicated refrigerators.
To browse our selection of kegging systems, click here!
By far the most common system used by home brewers for draft beer is the 5-gallon soda canister, originally manufactured by the Cornelius Company (Annoka, Minnesota). Though other companies also make similar models (notably the Firestone brand [Spartanburg Steel Products, Spartanburg, South Carolina], whose kegs are virtually identical to Cornelius’s — though parts are not necessarily interchangeable), the style is usually referred to as a Cornelius or “Corny” keg. These stainless steel canisters were developed and used to distribute premixed soda for common restaurant dispensers. The keg shape, capacity, and fittings are standardized, and over the years millions have been manufactured. Nowadays, soda producers are replacing the kegs with disposable poly bags in cardboard boxes. The old kegs can be purchased from soda distributors and reconditioned for a higher purpose. It takes only a small conceptual leap to see they can dispense beer the same way they once dispensed diet cola.
This article focuses on Cornelius-type kegs because they are the most commonly used kegs in home brewing, and also because they require some instruction. A variety of other home draft systems are available on the market, complete with documentation and home brewer-friendly features. For these, inquire at your local homebrew supply store or consult the companies advertised in this magazine.
The complete Corny keg draft-beer system is very simple. A typical system includes a Corny keg to hold the beverage, a CO2 (carbon dioxide) gas tank to pressurize the Corny keg (for force-carbonation and dispensing), a gas regulator to lower the gas-tank pressure to a usable level, a hose with a quick-disconnect fitting to connect the CO2 tank to the Corny keg, and a hose with a plastic faucet or “picnic tap” and quick-disconnect fitting to dispense the beverage.
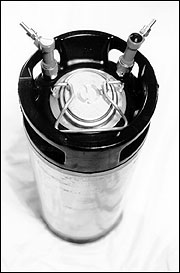
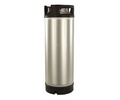
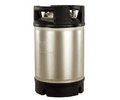
The Corny keg: Most Corny kegs are 8½ in. in diameter, about 26 in. tall, and hold 5 gallons of liquid. Somewhat shorter, 3-gallon kegs are available, and a larger diameter 10-gallon variety can occasionally be found. The top and bottom ends of the kegs are covered with shock-absorbing plastic caps. The cap on the top end of the keg is molded to provide handles for easy lifting, although older kegs made by the Cornelius Company had no end caps at all but relied on a single metal handle bolted to the top. Kegs may or may not have a pressure-relief valve in the lid — an important safety feature.
Corny kegs are available with two types of valves, ball-lock and pin-lock, which refer to the method used to couple the hose fittings to the valves. The fittings are threaded slightly differently and are not interchangeable, so it’s a good idea to pick one keg type and stick with it to avoid confusion. Ball-locks are a bit easier to disassemble with your average socket set. Relative availability varies by region.
CO2 tank: You’ll also need a high-pressure CO2 tank to provide gas for carbonating and dispensing the beer. Used steel tanks are usually available in a 25-lb scuba size and can be purchased empty by mail order or from your local supplier for about $120. Welding supply shops will often lease the 25-lb tanks and charge only for the gas.
Used aluminum tanks — often in 2.5-, 5- and 10-lb sizes — are also available and are sold new by many mail-order houses. Prices for new tanks vary considerably; aluminum is usually more expensive than steel, $80–100 for the 5- and 10-lb sizes, but their smaller sizes are much more convenient. Unless portability is a big consideration, go for at least the 5-lb tanks. Better yet, just buy a 10-lb tank. The folks who fill the tanks charge a flat labor fee regardless of size, so keep in mind that smaller tanks may cost anywhere from two to four times as much to fill per pound of gas.
All tanks should be stamped near the top with a pressure test or certification date, and must be re-certified every five years. If you can’t find a date stamp, ask the person selling the tank to show it to you. No responsible dealer will fill a tank with an expired certification. Recertification, if needed, will cost you extra.
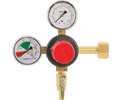
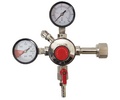
Pressure regulator: You’ll also need a single- or dual-gauge gas pressure regulator for the tank, which is used to drop the gas pressure from the 800 psi or so in the tank to the 10–30 psi you’ll need for force carbonation and dispensing. The regulator is adjustable so you can set the output pressure to control carbonation levels and to control how the beer serves.
Regulators include a pressure relief valve that will blow at or below the maximum pressure indicated on the low pressure gauge — around 50–60 psi for most regulators.
One or two gauges? Both single- and dual-gauge styles work perfectly well. Both include a gauge that indicates the output (low) pressure setting, which is the most important information you need.
The dual-gauge unit also includes a second gauge that indicates the tank pressure, which tells you roughly how much gas is left. Knowing the tank pressure, though, is only marginally useful; it drops from 400 to 0 psi in what often seems to be the last few minutes of use. When the gauge says “almost empty,” for all practical purposes, it’s empty. But because dual-gauge regulators cost within a few dollars of single-gauge models (about $40 for single, and about $50 for dual), it’s probably worth it to get at least some warning. Nothing is worse than running out of CO2 at 7 p.m. on a Saturday night with thirsty friends in line at the cooler.
|
The Care and Feeding of a Cornelius-Style Keg |
|
All Corny kegs are assembled from many stainless steel parts and a number of rubber O rings. Most of these parts come into contact with the beer and therefore must be cleaned and sanitized before use. With careful disassembly and assembly, none of the stainless parts should ever need replacement. O rings can eventually dry out, crack, get cut, or simply get lost. One of the real advantages of Corny kegs is the wide availability of standard replacement parts. Most larger homebrew supply shops and mail-order suppliers will have all the parts you need, and several national distributors of restaurant and beverage supplies also carry all replacement parts.
Disassembly and Cleaning The lid: It should be easy enough to remove the lid and the large O ring used to seal it when the keg is depressurized by lifting the retaining bail (the lid won’t budge if the keg’s under pressure). Often the O ring will smell strongly of soda syrup. The smell can be removed by washing in warm soapy water. Many brewers prefer to buy an O ring kit to replace all the rubber parts to eliminate the syrup odor. I’ve never found the original O rings to have any effect on beer aroma or flavor, but the choice is yours. These large rings cost about $4 (about $7 for a kit). In any case, the O ring should be removed from the lid, and both parts thoroughly washed and reassembled, along with the retaining bail. The inside: A newly purchased keg should be very clean inside and not require any special treatment. An effective way to wash the interior, if it’s needed, is to add about 1–2 tsp of nonperfumed dishwasher detergent or TSP to about 2–4 qt of the hottest tap water available. With the lid in place and locked, shake the keg repeatedly, then drain and rinse. Usually, the kegs you buy will have only been used as soda canisters, and any residue they contain is easily water soluble. Kegs can be harder to clean after you’ve used them for beer making because of beer stone, protein deposits, trub, and so forth. A standard carboy brush will come in handy for loosening gummy material. The dishwasher detergent will then leave the keg bright. It’s sometimes difficult to tell whether the keg is completely rinsed, so after draining all detergent water I rinse three times — twice with very hot water, and a final time with cold water. The connector valves: Two valve assemblies, also at the top of the keg, allow the rapid connection and disconnection of the gas pressure line and the beverage dispensing line. These poppet valves are designed so that gas pressure inside the keg seals the valves shut when the keg is not connected during storage and transport. The gas and beverage hoses connect to these valves using “quick-disconnect” fittings. The valves and matching fittings come in either a ball-lock or a pin-lock style, which are just two different ways to couple the fitting to the valve.
Clean. Each of these valve assemblies consists of two main parts: the threaded connector that you just removed, and a poppet with a spring pressed into the housing. These valves can usually be cleaned with no further disassembly by simply hand-agitating them in hot soapy water (soak if needed). If you feel it is necessary to clean the poppet or replace one that no longer seals, simply depress the poppet into the housing with a nail or dowel and it will pop out the bottom. Reassembly is simply a matter of pressing it back in. Inspect the O rings. Inspect the exterior O rings for damage, and replace them if they’ve been cut. They can be removed from the valve housing using a small screwdriver — be careful not to use too sharp a tool.
The beer and gas tubes: Remove. After you’ve removed the valves from each side of the keg, you’ll see the two threaded connections integral to the keg. In the hole of each connection you should find a stainless steel tube. The tube on the gas side of the keg, the side marked IN, is only about 3 in. long; the other tube, on the beer side marked OUT, is much longer and reaches to the bottom of the keg. Remove both tubes by simply reaching into the keg and pushing the tubes up and out. Clean. The top of each tube is flared outward to retain the O ring and to prevent the tube from dropping through the hole into the keg. Carefully remove the O rings (original equipment on many kegs is often a rubber washer), and clean them and the tubes with warm water and detergent. A long tubing brush is handy for thoroughly cleaning the interior. Reassembly
Sanitizing
When you’re ready to rack from your fermentor to the keg, add about 2 qt of iodophor solution to the keg, seal it with the lid, and agitate. Rock the keg enough to get sanitizer inside both dip tubes, and occasionally invert the keg and depress the pin in the center of the valve housings using a large nail or other tool to allow any sanitizer in the tubes to drain out the valve assembly and sanitize difficult-to-reach parts. After a few minutes of agitation, I drain the sanitizer into an open pan and use it to sanitize the racking tube and cane. (Be sure that all the solution is drained from the long tube by standing the keg upright and depressing the OUT connector.) Leave the keg inverted in a clean container while you prepare for racking. |
Connections: To connect the gas tank to your keg and to dispense the beer, you’ll need two quick disconnects (about $5 each), a gas line, and a beverage line with a picnic faucet (about $15 each with swivel fittings).
Disconnect fittings are available in both ball-lock and pin-lock styles to match the keg type. In addition to the lock type, the fittings are also available with either hose barb or flare outlets.
The outlet side of the gas regulator will include a hose barb fitting, to which you’ll attach high pressure (thick-walled) gas tubing. To gain the most from your investment, it’s a good idea to terminate the end of this gas tubing with a flare-style outlet — a short metal insert with a female swivel nut. To gain the most from your investment, use the flare-style outlet — it’s a short metal insert with a male thread. This style of fitting allows you to connect either pin-lock or ball-lock fittings to your regulator and even connect several kegs at the same time. In fact, acquiring an assortment of vinyl hoses fitted with the matching swivel- flare nut fitting gives you lots of options beyond simple packaging and dispense.
If you know how to fill a bottle, then you can fill a keg. The process is basically the same, and sanitization is every bit as important.
Cleaning: Most of the component parts of Corny kegs will contact the beer, so it is extremely important that all parts — especially in used kegs — be properly cleaned and sanitized before use. For details on how to disassemble and clean Corny kegs, see the box, “The Care and Feeding of a Cornelius-Style Keg.” After cleaning your keg, leave it inverted in a clean container while you prepare for racking.
Priming: It is possible to prime your beer just as you would normally do for bottle-conditioning. You could then use a hand pump and picnic tap to dispense the beer. A CO2 system, however, makes it easier to obtain a consistent level of carbonation, and the carbonation can be adjusted at will.
Racking and purging: Some brewers prefer to purge the Corny keg with CO2 before racking to avoid any possibility of oxidizing the beer; others simply rack into the keg as they normally would any carboy. If you choose not to purge the keg, make sure your racking tube is long enough to reach to the bottom of the Corny keg when you begin. Ideally, it should be long enough to remain below the surface of the beer during the entire process to prevent aeration and premature staling of your finished beer.
After racking is complete, fit the sanitized keg lid into the top of the Corny keg and seal it with the retaining bail. Whether or not you purge before racking, it is important to purge the headspace with CO2 before pressurizing. If your keg has a pressure-relief valve, open the valve by pulling on the valve ring and turning the ring 90° to lock the valve open. To purge the keg, set the tank regulator to about 30 psi and connect the gas to the IN side of the keg. Let the gas flow into the keg for about 30 seconds or so, then close the relief valve. If your keg doesn’t have a relief valve in the lid, an alternative purging technique is to leave the lid unsealed to allow the keg to vent. You will need to reduce the purge pressure to about 5 psi to reduce splashing.
Once the headspace has been purged (it should only take a minute or two), seal the lid. You're now ready to carbonate.
Background: Your beer’s carbonation level, known as “the condition in the beer,” is determined by both the temperature and the pressure of the beverage. Most gases are more soluble in cold liquids than in warm, and higher pressures keep that gas from escaping into the atmosphere. The amount of gas dissolved in beer (its carbonation level) is measured in volumes. To say the carbonation level is “2 volumes” means that every cubic inch of beer has 2 cubic inches (at standard temperature and pressure) of CO2 dissolved into it.
As with all other aspects of beer, tradition and personal taste determine how much the beer is conditioned. Nonpressurized finished beer has between 1.2 and 1.7 volumes of CO2 per volume of beer. Most beer is packaged with 2.3–2.8 volumes of CO2 (compare this to sodas, which contain 3.5 volumes). Each beer style, however, has a traditional carbonation level, just as it has a traditional hop bitterness. Belgian ales and German Weiss, for example, are usually carbonated to 3–3.2 volumes but are sometimes found with as much as 5.1 volumes. In the case of cask-conditioned real ale, the desired level has to do with physics. At typical cellar temperatures (50–55 °F [10–13 °C]) and ambient pressure, an open cask of ale can hold only about 1 volume of CO2. That defines “true-to-style” carbonation for a British real ale.
|
Table I: CO2 Temperature–Pressure Guidelines for Carbonation |
||||||||
|
The following table shows the pressures of CO2 (in psi) required to achieve target carbonation (measured in volumes of dissolved CO2) at various temperatures. |
||||||||
|
Temp |
Volumes of CO2 in Solution |
|||||||
|
°F |
°C |
1.8 |
2.0 |
2.2 |
2.4 |
2.6 |
2.8 |
3.0 |
|
40 |
4 |
5 |
7 |
9 |
11 |
13 |
16 |
18 |
|
44 |
7 |
6 |
9 |
11 |
13 |
16 |
18 |
20 |
|
48 |
9 |
8 |
10 |
13 |
15 |
18 |
20 |
23 |
|
52 |
11 |
10 |
12 |
15 |
17 |
20 |
23 |
25 |
|
56 |
13 |
11 |
14 |
17 |
20 |
22 |
25 |
28 |
|
Not Just for Dispensing — Ferment, Lager, and Clarify with Cornelius-Style Kegs Some brewers like to use Corny kegs as fermentors. Although some published articles have commented on the less-than-optimal shape of the keg for fermenting (too tall and narrow), it is an option that has worked well for many. Primary fermentation: About the easiest way to temporarily set up a keg as a primary fermentation vessel is to simply remove the entire gas IN valve assembly and tube. Slip a length of ½-in. i.d. vinyl tubing over the threaded fitting and run it into an airlock. If you brew beers that typically have enormous amounts of blow-off, you can modify a keg lid for dedicated use as a fermentor by drilling a hole big enough for a blow-off hose. Enlarge it if needed using a hand grinder or file. Fittings, washers, and seals available at your local hardware store will enable you to use a blow-off tube that’s larger than ½-in. Secondary fermentation: To avoid these modifications and the cleanup associated with primary fermentation in Corny kegs, you can use them only for secondary fermentation. After completing the primary in a open fermentor, I rack to an unmodified, sanitized Corny. Every other day or so I relieve gas pressure that builds up inside the keg by simply pressing the gas-side valve or the pressure relief valve open for a second or two. Fermenting under pressure. For those who want to ferment under pressure to naturally carbonate their beer, constant-pressure relief valves can be purchased for both ball-lock and pinlock kegs. Lager brewers in particular will find it useful to control and maintain the pressure in the keg as the temperature drops slowly and the pressure increases. Typical adjustable relief valves are spring-loaded and can be set to relieve pressures between 5 and 30 psi. They attach to the keg’s quick-disconnect fitting. After the secondary fermentation is complete (or if I’m lagering), I prefer to rack a third time to a sanitized Corny keg. This final keg is placed in the fridge for force carbonation, cold conditioning, and draft dispense. Every time the beer is racked from one container to another, however, the chance of aeration and infection increases, and you may be uncomfortable using this technique. With careful handling, however, you won’t experience any problems. An alternative is to leave the beer in the primary a little longer than normal before racking to the secondary. The longer settling time will generally result in less sediment by the end of secondary fermentation. The secondary fermentor then also serves as the dispense tank, with the addition of a modified dip tube (the tube that’s in the OUT side of the keg). A popular recommendation for this application is to cut off the bottom ¾–1 in. of the long dip tube using a tubing cutter or a hack saw. After filing the end to remove burrs, reinstall the tube in the keg. The shortened tube will prevent the pickup of sediment during dispensing of moderately to strongly flocculant yeast strains. Another approach that works well is simply to add gelatin or isinglass finings to the beer on final racking from the secondary to the final tank and before cold storage. When well-mixed, the finings will drop any remaining yeast to the bottom of the keg, and even unmodified dip tubes won’t pick up the sediment. |
Table I shows the pressures that are needed at various temperatures to obtain a given level of carbonation. Choose the desired serving temperature (the temperature at which you’ll keep your keg) and the desired carbonation level (in volumes). The chart will indicate the conditioning pressure needed. After your keg of beer has had a day or so to condition at the selected pressure, you may need to reduce the pressure for serving (usually to about 10–15 psi). The carbonation level will eventually drop to this lower setting, but the process is very slow. You’ll probably find that, once carbonated, the beer can be kept at dispensing pressure until consumed.
For ale served at about 50 °F (10 °C), a good starting point is to carbonate the beer for several hours, maintaining 10 psi. The 3/16-in. diameter vinyl beer line tubing drops about 3 lb of pressure per foot of length, with an additional half pound pressure drop for every vertical foot that the keg is above the source. If you’re dispensing with a 3-ft, 3/16-in. i.d. dispense hose and picnic tap, a 10 psi pressure should give you a very nice serve. At pressures of 15 psi and above, you’ll probably see a little excess foam.
Now you’re ready to carbonate the beer: With the tank set at the pressure required for the desired carbonation level, allow the keg to pressurize until you no longer hear any gas flow, then agitate the keg by rocking it gently (on its side, for best results). This agitation exposes more surface area of the beer to the CO2 and allows the gas to dissolve faster.
If you can refrigerate the keg with the gas supply attached, then simply leave the regulator set to the desired pressure and agitate occasionally. When the beer is at serving temperature and no more gas flows into the keg when you agitate it, the beer is conditioned. The time needed to get perfectly conditioned beer depends only on how quickly you can cool the beer to serving temperature and how much time you spend agitating it to dissolve the CO2.
|
Filling Bottles from Your Keg |
|
Once you start kegging, you may still want to bottle some draft beer to give to friends or to send off to competitions. You can pour the beer into a bottle from the tap, but it’s hard to do it without aerating the beer, creating foam, and making a big mess. You can solve these problems by using a simple counterpressure filler. The term counterpressure refers to the fact that once a bottle has been purged of air it is pressurized with CO2 to the exact pressure of the dispensing keg. Nothing happens when the beer inlet valve is opened because the whole system is at the same pressure — there is no net force to move the beer from the keg into the bottle. When the bleed valve placed in the bottle’s opening is slowly opened to the atmosphere, the pressure in the bottle is reduced just enough to cause beer to flow into the bottle. The flow of beer is controlled, or “countered,” by the gas pressure maintained in the bottle. Very little foaming results, and the bottle can be filled uniformly with little or no exposure to air. The basic design of all commercial fillers includes two tubes that pass through a rubber stopper fitted inside the mouth of a beer bottle. One of the tubes is used for both purging the bottle with CO2 and filling the bottle with beer from the keg (a pair of valves is used for selecting either gas or beer). The second tube is used to bleed air from the bottle as it’s being purged with CO2, and to bleed CO2 as the bottle is filled with beer. Commercial fillers can cost anywhere from $50 to $150. For information on making your own simple counterpressure filler, refer to a recent BrewingTechniques article by Bennett Dawson. |
If you can’t refrigerate the keg while connected to the CO2 tank setup, you’ll have to repeatedly connect the gas, agitate the keg, disconnect, and continue cooling. With the regulator set to the desired final keg pressure, each charge of gas is fairly small. To speed the process, you can overpressurize on the first few charges. This puts more gas into the keg. On each successive charge, reduce the regulator pressure downward toward the desired final pressure. With practice, you can gauge this process so that on the last attempt to add gas at the final pressure and temperature only a small amount of gas flows into the keg and conditioning is complete.
|
Jockey Boxing Your Beer |
|
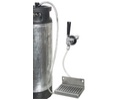
One of the challenges of kegging your beer is chilling it for dispensing if you don’t have a refrigerator to store it in (once chilled, it will stay cold for hours). The jockey box is one handy solution that allows portability and flexibility in how and where you dispense your homebrew. A jockey box is essentially a coil or plate cooler set up in an ice chest. You may have seen them at outdoor tastings or beer festivals — standard beer faucets mounted through the front of a picnic cooler. Inside the chest, one end of a stainless steel coil mounts to the back of the faucet, and the other end of the coil exits through the back side of the cooler and connects to the keg. The coil inside is surrounded by ice. When the faucet is opened, beer under pressure from the keg is pushed through the coil and chilled before it pours out the tap. Jockey boxes eliminate the need to keep the entire keg cold (although you’ll always want to keep your beer at least cool). To get cold draft beer, you need only fill the cooler with ice. |
Regardless of the technique you use, fully conditioned beer can be yours in a matter of days.
Whether or not you force-carbonate your beer, you will find yeast sediment at the bottom of your keg. Cutting 3/16-in. from the end of the long dip tube will prevent sediment pick-up during dispense.
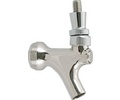
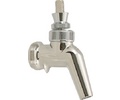
A cold draft: Instead of using a simple picnic tap to dispense their beer, many brewers choose to install a beer faucet right in the fridge.
With the convenience of CO2 pressure, an entire world of opportunity opens up to the inventive home brewer. CO2 can be used to pump beer anywhere you want. You can easily set up a closed transfer system for moving beer from one keg to another by using quick-disconnects with threaded fitting outlets and lengths of tubing terminated with female swivel fittings.
A draft system also makes filtering easier. Replaceable cartridge filters can be installed in the transfer line to provide crystal clear beer in the dispense keg. Other optional equipment includes counterpressure bottle fillers, insulation jackets, and adjustable pressure relief valves. Corny keg fittings and repair parts are available almost everywhere soda is sold. The 5-gallon soda canisters offer an endless variety of other uses.
If you choose to modify your keg, limiting your experiments to the keg lid will ensure that mistakes can be easily fixed without destroying the keg itself.
Kegs that are just too ugly to use for beer, or are missing valve parts and aren’t worth reconditioning, make excellent storage containers for grain and hops. And don’t overlook the container’s original purpose; many homebrew supply shops also sell soda-making kits. You may find that making your own root beer or ginger ale is a lot of fun, or you may just like having a few gallons of soda water on hand to quench a summer thirst.
For about $200 you can easily relieve yourself of the tedium of priming and bottling and enjoy the convenience and flexibility of a complete kegging setup. Once you’ve tried it, I’m sure you’ll never want to go back. If you’ve often thought you’d like to have complete control over your beer’s carbonation level, or you’d like to filter it more easily or ferment under pressure to naturally carbonate, kegging is probably your answer.
All contents copyright 2024 by MoreFlavor Inc. All rights reserved. No part of this document or the related files may be reproduced or transmitted in any form, by any means (electronic, photocopying, recording, or otherwise) without the prior written permission of the publisher.


.png)
.png)
(1).png)
.png)


.jpg) Because many home brewers acquire used, reconditioned kegs, and because there’s no way of knowing where that used keg came from, it’s always a good idea to disassemble used kegs completely and inspect them for damage (such as pitting or rust spots inside), residue, and general cleanliness. The kegs may well need a good scrubbing with B-Brite.
Because many home brewers acquire used, reconditioned kegs, and because there’s no way of knowing where that used keg came from, it’s always a good idea to disassemble used kegs completely and inspect them for damage (such as pitting or rust spots inside), residue, and general cleanliness. The kegs may well need a good scrubbing with B-Brite.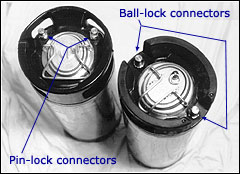 Remove. The two valve assemblies thread onto the keg like any nut to a bolt. For ball-lock kegs, use any wrench or socket that matches the fittings (one is usually a standard hex shape, and the other usually a 12-point style), turn them counterclockwise, and remove them from the keg. On pin-lock kegs, the gas-side connector uses two pins 180° apart, and the beer side uses three pins 60° apart. The pins make it difficult to get a wrench on the beer-side. Many brewers modify a spark-plug socket wrench by cutting slots in the corners for the pins to fit into, which prevents accidental snapping of the pins off the connector.
 Sanitize. Soak the valve assemblies in iodophor before reassembly.
 Reassemble the keg by inserting the long dip tube into the OUT side of the keg and the short tube into the IN side. Thread the valves back on, remembering to put the gas and beverage valves on the correct sides of the keg.