MoreBeer!'s Primer on Growing Hops that we send out with every rhizome. Also consider reading the Growing Hops article that appeared in a past issue of Brewing Techniques Magazine.
Wondering how to grow your own hops? Growing your own hops at home is easy, fun, and very rewarding - especially if you brew your own beer at home. Hop Vines grow from a rhizome, which is essentially a piece of root taken from a larger, mature plant. The rhizome is planted in the ground in the late spring and small, green shoots pop out of the ground a few weeks later. A hop vine can be very vigorous, growing up to 2' per week till the end of June when growth slows down and the plant enters into flowering stage.
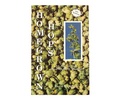
Hop Rhizomes are available once per year, typically in March/April, after the farms dig up the rhizomes and ship them to suppliers. You can sign up for our email newsletter to be alerted to when they are available for pre-sale. Our pre-sale starts in February and allows you to order the hop rhizomes in advance to make sure you can get the varieties you want. When they come into stock they will be automatically shipped to you. When you receive your hop rhizomes in the mail, keep them refrigerated (but not below freezing) and well ventilated until your soil is ready for planting.
Choose a southern exposure if possible but an east or west exposure will do, just keep in mind the hop cones will not get as big. Hops prefer light-textured, well-drained soil with a pH of 6.0 - 8.0. If drainage is a problem, build mounds for planting. Dig holes about 1 foot deep so some manure or other slow release organic fertilizers such as cottonseed meal, bone meal, rock phosphate, etc… can be mixed with your soil and returned to the hole so the nutrient are in the root zone. Plant mixed varieties at least 5' (feet) apart to prevent tangling. Identical varieties can be planted as close as 3' apart. You should also consider how you will support the vine when selecting a location.
Hops like to climb so planting close to a fence, wall or post is a good idea. Many people connect a strong twine/string from a stake in the ground to a hook secured in their house, fence, etc. After the hops pop out of the ground, and when they are about 1 foot in length, wrap them clockwise around your support string or pole. They will continue to grow up the string, occasionally needing your help in being wrapped. In the first year, when growth is not too vigourous, you can even use a long 8' stake.
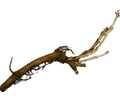
Rhizomes can be planted vertically or horizontally. If the rhizome is already starting to bud, plant in a position so the buds are pointed upward. In either position cover the rhizome with approximately 1" of dirt.
First year hops have a minimal root system, therefore the soil should not be allowed to remain dry for long. Mulching the soil surface will form some organic matter will work wonders in conserving moisture as well as controlling weeds. However the soil does need to occasionally dry out as continual overwatering can cause the rhizomes to rot. The good balance is to soak them, allow the ground to dry, then immediately water again. Using a timer can make this very easy. Add small additions of a generic fertilizer during the growing season to assist your plant. However, note that adding a lot of fertilizer (nitrogen in particular) will result in a robust plant but the cones will have a lower alpha acid content.
After your hop vine flowers you will begin to see hop cones forming. We know you will be super excited to pick them, smush them, smell them, brew with them, love them, etc.. Resist the urge because the hops will not be ready for harvesting till late August or September. As the harvest appproaches a good test of readiness is to squeeze the cone in your finger, if the cone is damp, very green, and stays compressed after you squeeze they are not yet ready. As the hop cone becomes ripe they will start to dry out. When you compress them between your fingers they will expand back to their original shape. You will also see more lupulin, the yellow powder in the hop cone. This lupulin will make your hands sticky and is a good inidcator that you are getting close. As the hope cone ripens the aromatics of the hops also become much more pronounced.
When you make the decision to harvest cut the twine/string at the top and let the bines lay down on the ground. As the vine dries, the sap will go back down into the rootstock for winter storage. After cutting down the vine you can then pick off the hop cones and prepare to dry them.
After the first year, the earliest shoots coming up from the ground should be pruned off. The second set of shoots that comes up is the sturdier second growth. After you have chosen 3-4 main vines from the second growth, all subsequent vines should be pruned from around the base of the hop plant so that all the energy can go into the main vines you selected.
You can dry your hops by using a food dehydrator. The hops will need to dry for several hours. You will know they are done when you open up a cone and it is dry on the inside. If the hops feel papery and petals break off easily from the stem, the hops are ready. If you don’t have access to a food dehydrator, you can dry them in an oven slowly on a very low temperature. You can also pick the cones and set them outside to dry on a screen, out of direct sunlight. You can also put them in a paper bag and shake daily. Air circulation and time are the two essentials for successfully drying hops.
However you dry them, try not to over dry the hops to the point where the petals and stem shatter in your hand when you open up the cone. You also do not want them to dry to the point that they turn brown. Overdrying will also result in a loss of Alpha Acid content. After drying, place your hops in an airtight container, and store in the freezer or refrigerator.
Of course you won't know the exact alpha acid content of your hops. We suggest to primarily use them for aroma and flavor additions and use a store bought, alpha acid rated hop for bittering. If you do want to use for bittering we suggest that you first research the general alpha acid range of the hops you grew. Use that number to determine how much to use and after tasting adjust quantities with your next brew.
Enjoy - There is nothing like growing your own hops that you then use to make your own beer!
All contents copyright 2024 by MoreFlavor Inc. All rights reserved. No part of this document or the related files may be reproduced or transmitted in any form, by any means (electronic, photocopying, recording, or otherwise) without the prior written permission of the publisher.


.png)
.png)
(1).png)
.png)