Q and A with The Troubleshooter Dave Miller (Brewing Techniques)

Racking and Wort Aeration
Question: Two questions: First, my brewing buddies and I disagree about racking. They rack several times during fermentation to clarify their beer. This practice seems likely to introduce oxygen and infections. I strain out hot break and hops upon transfer to my primary fermentor and leave everything until bottling two to three weeks later. I racked the last batch after yeast flocculation (7–8 days) and then added a plug of aroma hops as dry hops. The advantages of racking, and when, remain unclear.
Second, upon pitching, I pour my cold wort back and forth from my wort pot to fermenting pail to foam and aerate. I realize some airborne infection may possibly get in, but it seems the added exposure of a few minutes pouring, when the pots and pails are already open, presents little added threat. Any thoughts?
David Miller: These two questions point out one of the biggest dilemmas that brewers face. On the one hand, anytime you expose cold wort or beer to air, you risk infection. On the other hand, you sometimes have to move the beer around to accomplish something important.
Racking: The main reason for racking beer after primary fermentation is not to clarify it but to separate the beer from the layer of sedimented yeast on the bottom of the fermentor. When fermentation is drawing to a close, the yeast cells sense that their sugar supply is dwindling. They quit fermenting sugar and instead concentrate on building up their reserves of glycogen, looking to survive the lean time ahead. Many of them also flocculate at this time and drop out of suspension. They lie dormant at the bottom of the vessel.
Even in this dormant phase, however, metabolic activity continues, albeit slowly. Eventually, the yeast cells use up their glycogen reserves and face starvation. At this point they resort to what can only be called cannibalism. They excrete enzymes that dissolve the walls of neighboring cells, thus making available the nutrients that those cells contain. This process is called autolysis. It is easy to identify autolysis by examining the yeast slurry. Autolyzed yeast darken and take on a red or orange tinge. Autolyzed yeast also give off a sulfury odor that is much stronger and less pleasant than the clean, yeasty smell of a healthy yeast crop.
How long does it take for autolysis to begin? That depends on temperature and the strain of yeast. The colder the yeast layer, the longer it will stay in good condition. At the Saint Louis Brewery, we crash cool our ales (drop the temperature from 70 °F to 34 °F over 24 h) as soon as fermentation is over. The yeast drop to the bottom and are usually good for repitching for about a week. It takes at least three weeks for autolyzed flavors to noticeably taint the beer. If we were unable to crash cool, however, autolyzed flavors would develop much more rapidly — most likely in less than a week.
Because most home brewers lack the facilities to crash cool their beer after fermentation, I generally recommend racking as soon as most of the yeast has settled to the bottom, three to four days after the end of primary fermentation. If you exercise caution and thoroughly clean and sanitize all equipment that touches the beer, the risk of picking up an airborne infection during transfer is minimal. Let experience be your guide. If your friends are having no problems with infected beer, then I would recommend they stick with racking.
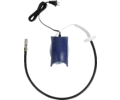
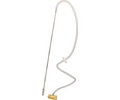
Wort aeration: It is absolutely vital that the wort be saturated with air immediately before or after pitching. Yeast need oxygen to grow, and a strong growth of young, actively fermenting yeast cells will rapidly choke off most competing organisms (infections, from our point of view). They do this by creating conditions that make it difficult for their competitors to survive and by using available nutrients for their own growth.
Any method you can use to ensure complete aeration of the wort will almost certainly produce a cleaner flavored beer than you would get without it. The test here is your lag period. Assuming you pitch a large enough yeast slurry or starter, ale yeast should show vigorous fermentation in 8 h or less. Lager yeast may take longer (as much as 16 h) because of the cooler temperature.
Having established that aeration is vital, I would add that a system that is capable of forcing more air through the wort in a shorter period of time, and that can do so without requiring exposure to airborne dust, is preferable to the less certain and riskier method of pouring wort back and forth between two containers. In my own home brewing, I was never able to get as good aeration by your method (judging by lag times) as I was with my aerating stone setup. I don’t want to exaggerate the risk of infection that your method poses, but because the stone works better and is less dangerous, why not try it?
And so back to where I started this reply. In working out a brewing method — which includes putting together a set of equipment — a brewer faces a lot of choices. Often, no answer is perfect. To minimize one danger, you may have to incur another. But experience and understanding will enable you to weigh the risks that each choice poses, and good techniques and equipment can greatly increase your chances of success.
Brewpub Filter Selection
Q: I am involved in a brewpub project, and my partners and I have selected a company to build the equipment. When I looked at the bid, I noticed that it didn’t include a filter. I thought we would have to filter our beer, so I asked the company, and the answer was, “Oh yeah, I guess you’ll want one.” They followed up with a supplementary bid for a Della Toffola-plate-and-frame sheet filter. But other brewers, including you, use a diatomaceous earth filter. Are diatomaceous earth filters better? Which would you pick if you were to do it again?
DM: If I were to do it again, I’d get another diatomaceous earth pressure leaf filter, mostly because I’m familiar with it. But that doesn’t mean it’s the right choice for everybody. Both types have advantages and disadvantages.
Sheet filters are easier to operate. Basically, you assemble the filter with the new sheets, flush it out with sanitizer and plenty of water, and then push the beer through it. Assembly can be tricky, but using one is similar in principle to using a
homebrew cartridge filter. On the other hand, the filter run takes a long time, and the sheets are quite expensive. Even though sheet filters are usually cheaper to buy initially, the high operating costs make them more expensive over the long haul. Another drawback is that a sheet filter has a fixed capacity. Given a particular grade of sheet, say 5 µm the filter will remove only so much yeast, and that’s it. If the filter blinds (stops working because it’s completely plugged up), you have no recourse but to break the thing down and then reassemble it with fresh sheets to finish the run.
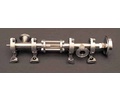
Diatomaceous earth filters, on the other hand, are more flexible. A pressure leaf filter works by pumping the beer through a stack of leaves on which a cake of diatomaceous earth filter medium has been deposited. The key to the filter’s high capacity is that as the filter run goes on, you continuously inject diatomaceous earth slurry into the stream, so the beer is always presented a fresh surface layer of filter medium. This means that diatomaceous earth filters, if correctly operated, don’t plug up very fast. And if you have a difficult situation — for example, you have to filter a batch of beer after only a week, rather than the two weeks you would prefer — you can load up the filter with an extra large dose of diatomaceous earth, which will take care of the extra yeast that you have to remove.
Diatomaceous earth is not a panacea. If you operate it incorrectly, a diatomaceous earth pressure leaf filter can be blinded very rapidly. And believe me, it is easy to operate one incorrectly. Furthermore, the simpler and cheaper the filter is, the harder it will be to use. The fancier filters with an open dosing tank and a metering pump to feed the slurry are much more consistent and easier to use than the bottom-of-the-line models with erosion tanks. Unfortunately, a low-priced model is often all a start-up brewpub can afford.
It’s possible that you don’t understand some of the terms I used in the last paragraph. That’s okay, but it brings me to my last point, and it’s an important one. You should spend at least as much time talking to your supplier about filters as you do talking about unitank design or brew kettle venting. If your supplier doesn’t know what those terms mean, or can’t explain them to you, you are dealing with the wrong company. Whatever filter you end up with, you will need help in learning how to use it. It took me about 60 filter runs before I really understood how my unit works, and even now it is probably the single most difficult piece of equipment that I use. Nobody ever learned how to operate a filter by reading the instruction book. So make sure that somebody will be there to help you with your first run and will be available when you have problems.
The Effects of Pennies in Wort
Q: I was concerned when you mentioned tossing a couple of pennies into the boiling wort to increase copper content. My dad is a coin collector and subscribes to several coin publications. I recently read an article about a young child who became violently, dangerously ill from ingesting newly minted pennies. Apparently they are not all copper these days. I am not a chemist or a doctor, but I think the culprit was zinc. Apparently large doses of this metal leached out of the pennies into the child’s digestive system and nearly killed him with the overdose. Perhaps this cannot happen in the wort boil. Perhaps it can. Perhaps it would bear further scrutiny from a chemist or doctor or whatever.
DM: Let me start by saying that I am not a chemist or a doctor, either, and I invite any readers who are to shed light on this question. I did do some investigation, and here is what I have been able to learn:
First, the United States Mint in Philadelphia confirmed that beginning with coins minted December 17, 1981, all pennies contain 97.6% zinc and only 2.4% copper. The copper is used as a coating on the surface of the coins. Before that date, pennies had been struck from an alloy of 95% copper and only 5% zinc. If you want to dose your wort with copper, use one of these older pennies or substitute a small piece of copper pipe.
The question that arises in my mind is how a child could be poisoned by these copper-coated zinc pennies. Zinc is an important nutrient, and the FDA recommends an intake of 15 mg/day for adults. My own children have swallowed a few pennies over the years and passed them without apparent ill effect. As I understand it, the biggest danger posed by ingesting coins is obstruction of the digestive tract, which can be life threatening. However, our pediatrician never considered coin-swallowing an emergency. He advised us to keep an eye out for signs of distress and to react promptly if, and only if, such signs appeared.
There is a rare condition called Wilson’s disease, which involves an intolerance to copper. If a person suffering from this disease were to swallow a penny, the dissolution of copper by gastric juice (which contains
hydrochloric acid) would certainly cause a severe reaction in the patient.
In any case, we need to recall the context of this question. It is possible, though unlikely with an all-malt wort, that the lack of trace minerals, particularly copper and zinc, may cause a hanging fermentation. If you are sure that your problems are not due to old yeast or insufficient aeration of the wort, you may want to consider putting a small piece of copper, or zinc, or both, in your brew kettle. Wort is mildly acidic and only a small amount of the metal will dissolve in it. If that were not so, copper would be a very unsatisfactory material for brewing kettles.
All contents copyright 2024 by MoreFlavor Inc. All rights reserved. No part of this document or the related files may be reproduced or transmitted in any form, by any means (electronic, photocopying, recording, or otherwise) without the prior written permission of the publisher.


.png)
.png)
(1).png)
.png)