by Terry Trentman (Brewing Techniques)

Electric water heater elements can provide abundant power for brewing when propane or natural gas isn’t an option.
Ten years ago, I was living in Utah and becoming desperate to find a real beer. A friend of mine introduced me to home brewing, and I was hooked.
I found a brew supplier in Salt Lake City and bought my first “soup-can kit.” My first batch went pretty well, but soup-can brewing was not challenging enough. So I built an electric plastic bucket system like the one I saw in the brew supply store. (I think it was the BruHeat from BrewCo [Vilas, North Carolina].) I progressed to all-grain brewing and learned to make some really great beer.
Gatherings at my basement bar grew larger, and it became obvious that I needed to build a bigger brewing system. The electric half-barrel systems I investigated were too expensive. I didn’t want to use a propane system because venting in the basement could be a problem and it gets too cold in Michigan to brew outside, so I decided to enlarge my old electric system.
I had enough room in my corner of the basement “dungeon” for a three-tiered brewhouse, so I built the frame out of 2 x 4s and plywood, used deck screws to put it all together so I could dismantle and move it if necessary.
This article describes the design, construction, and operation of my all-electric half-barrel brewery.
On opposite sides of the barrel, an inch above the hop screen, I cut two holes large enough to weld in 1-in. straight pipe couplings purchased from a metal fabrication shop. Each coupling holds a standard 220-V, 2500-W screw-in type domestic water heater element. The heating element has a 1-in. straight thread, so I used a straight-threaded coupling instead of a tapered (NPT) coupling to allow the heating element gasket to seal easily against the coupling. (Because calcium and lime in our water tend to stick to the heating elements, I always remove the elements after brewing and clean them.) I drilled a ½-in. hole for the drain and welded a ½-in. tapered pipe fitting for the shut-off. Finally, I cut a 12-in. hole in the top with a plasma cutter and smoothed all welds with a grinder.
The hot liquor tank was a little easier. I cut out the top, drilled a ½-in. hole 3½ in. from the bottom, and installed the ½-in. tapered coupling for the drain. I welded the straight coupling for the heating element as I did with the boiler. Then I drilled a ½-in. hole near the bottom of the boiler and welded a ¼-in. tapered coupling for the thermometer. (I only used one 4500-W, 220-V heating element for the hot liquor tank because I need it to reach only 170 °F [77 °C].) A simple switch controls the power to the heating element.
After I had assembled the system, I filled the kettle with cold water and turned both thermostats on high as a test. In less than an hour it was really boiling. I adjusted both thermostats down a little so they would cycle; it was still a very vigorous boil, and the lower setting prevented any scorching of wort. The dual-thermostat system gives excellent control of the boil; one element will heat for a few seconds and shut off, then the other one will cycle.
The downside was, however, that I was generating a huge amount of steam. My brew dungeon looked like a sauna. Water was dripping from everything. The fix was fairly easy: I had a tin shop make a two-foot-square boiler bonnet. I cut an 8-in. hole in the top and attached a bathroom-style exhaust fan to vent the steam outside through a dryer vent hose. This setup worked great and eliminated any steam in the basement. I miss that sweet aroma of malt on brewing day, though.
I wired up an electrical box with two stove thermostats that will handle 2500 W at 220 V with outputs to an electrical box and plugs for each heating element on the boiler. I epoxied a short piece of PVC pipe over the electrical end of the element. I hooked up a 12-gauge extension cord between the heating element and the plug and filled the PVC pipe with silicone to seal it from moisture. I used ground fault interrupt (GFI), 30-A, 220-V breakers for each barrel and 12–2 AWG household wire throughout. Each barrel is on a separate circuit.
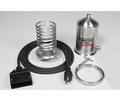
I built a RIMS heater out of 1-in. copper pipe. I soldered a 1-in. threaded fitting to one end of a 12-in. pipe. I capped and soldered the other end and drilled two ½-in. holes in the pipe, one on each end. To allow for the flow of wort through the heater, I soldered a 3-in. length of ½-in. i.d. pipe where I had drilled the holes. Because the pipe fitting I installed has a tapered thread and the heating element has a straight thread, I had to ream the pipe thread with a 1-in. tapered tap to allow the element to thread in far enough for the gasket on the element to make contact with the copper fitting.
For temperature control, I used a White-Rodgers contact-type thermostat from Grainger (catalog number 2E350) that was designed to attach to a boiler. The thermostat senses the temperature of the wort passing through the pipe and shuts off when the desired temperature is reached. I clamped it to the pipe and wired it to apply 120 V to the heating element (1500 W). I provided two additional 120-Vac outlets from the thermostat: One outlet is switched with the heating element, and one is hot all the time. I can use either one to provide power for the pump.
Click here to browse our selection of RIMS Rockets and temperature controllers by Blichmann!
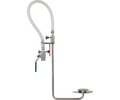
For the mash tun, I used an old insulated 40-qt cooler that can hold 30 lb of grain. I made an H-shaped manifold out of ½-in. pipe with four caps and three tees. I ground ⅛ in.-wide notches about every ½ in. and removed the burrs from the pipe. To ease disassembly and cleaning, I didn’t solder any of the fittings.
I made my sparger out of ½-in. pipe also, using four elbows and one tee. I cut the pipe so it would fit tightly inside the insulated cooler and drilled 1/16 in. holes every couple of inches to sprinkle sparge water on the mash. It’s basic, but it works.
I chose a magnetically coupled Teel pump from Grainger (catalog number 2P039). It will handle the temperature required and will lift liquid more than 10 ft. It isn’t self-priming, though, so I have to be sure it is full of liquid when I fire it up, but that hasn’t been a real problem. I also installed a shut-off ball valve on the output of the pump to limit the flow; the pump doesn’t seem to mind.
To break up the brew day, I like to mash on Friday night and boil on Saturday morning. Mashing for eight hours apparently causes no problems, and my conversion is excellent.
Late Friday night, I heat the hot liquor tank to about 165 °F (74 °C), add the grist to the mash tun, and start adding water through the perforated manifold in the bottom. I stir to eliminate dry spots, then check the temperature of the mash. I mash at 150 °C (65.5 °F). If the mash is a little warm, I add some cold water and stir until the temperature of the mash is correct, then close the lid. Then I cover the mash tun with blankets and hit the hay.
At about 8:00 on Saturday morning, I start my RIMS to heat the wort back up for mash-out. The temperature of the mash has dropped to about 130 °F (54.5 °C), and I need to bring it up to 160 °F (71.5 °C) for mash-out and to clear the wort.
To begin the process, I siphon the sweet wort from the manifold of the mash tun down to the heater and up to the pump. The pump and the RIMS heater are positioned below the mash tun so that a siphon starts easily. This primes the pump. To the output of the pump I attach a hose that has about 20 ⅛-in. holes drilled in it, and I curl the hose in a loop and lay the loop on the grain bed in the mash tun. Then I turn on the pump and heater and allow the output from the pump to run into the mash tun for a minute or two until it is running clear of debris. I shut off the pump again and plug the end of the hose, causing the wort to flow out through the little holes in the hose. I lay the hose on the grain bed, turn on the pump again, and use the ball valve on the output of the pump to adjust the flow to the mash tun so as not to disturb the grain bed. The heater does a fine job of getting the mash temperature back up to 160 °F (71.5 °C), raising the temperature about 2 °F (1 °C) per minute.
While I’m heating the mash, I start heating the sparge water in the hot liquor tank, shutting off the switch when the temperature is up to 170 °F (77 °C).
In half an hour the mash temperature is up and I am ready to sparge. I shut off the pump and heater, disconnect the hoses, and drain the hoses and the RIMS heater into the mash tun. I attach a hose from the hot liquor tank to my rectangular copper sparger and place the sparger in the mash tun. Then I start a siphon out of the perforated manifold at the bottom of the mash tun and let it run into the kettle. (I didn’t want to make holes in my cooler because I might need it to cool beer.)
I regulate the flow to the kettle with a clamp and keep the mash covered with sparge water. I sparge until the wort’s specific gravity drops to 1.008 or its reaches 6.0. It usually takes about 30 minutes to collect 12 gallons, and as soon as the sweet wort has covered the heating elements of the kettle, I fire it up.
The kettle reaches full boil within 30 minutes and I add hops as the recipe dictates. Near the end of the boil, I open the valve of the kettle, purge the air through the pump, pump hot wort through my homemade counterflow chiller, and return the wort to the kettle to sanitize it. I let it flow for 20 minutes, shut the pump down, and turn on the cold water to the chiller.
The chiller, which rests in a sink, consists of 50 ft of copper tubing and has no problem cooling the wort to 60 °F (15.5 °C) or cooler if I want. I pump in the wort, regulating the flow with the valve on the output. When the wort is cool, I pump it to the carboys, filling two carboys in 20 minutes. I add my yeast culture to the fermentors, shake them up to oxygenate, and install blowoff hoses.
Building this all-electric system was a challenge, and I am extremely happy with how well the system works. It takes me about two hours longer to produce twice the beer I used to. My goal was to stay under $ 1,000 for complete construction; I managed to stay under $ 700.
I don’t think I am going to change much in the system. It would have been handy to have my sink closer to the brewhouse, because my chiller is used in the sink. But that would have meant putting the sink under the electrical panel, and that wouldn’t work because I tend to splash a lot when cleaning my brewing equipment.
As a final note, if you are considering building an electric system, remember to observe good grounding techniques and seal any electrical connections that could come in contact with moisture. If you haven’t worked with 220 V before, get an electrician to look over your work before you plug anything in. Getting zapped, especially at 220 V, is something you don’t want to risk. Your beer should be stunning, not your brewhouse.
All contents copyright 2024 by MoreFlavor Inc. All rights reserved. No part of this document or the related files may be reproduced or transmitted in any form, by any means (electronic, photocopying, recording, or otherwise) without the prior written permission of the publisher.


.png)
.png)
(1).png)
.png)