Beyond Extract: What A Homebrewer Needs To Go From Extract To All Grain
09/23/2020
By Tim Murray
When I was 30 years old, I brewed my first batch of beer. I had thought about brewing beer many times before, but this was my first time actually firing up the kettle. I was excited. I eagerly watched the combination of extract and water on the stove, and when my wife asked what I was staring at so intensely I proudly proclaimed, “a watched kettle never boils, but an unwatched kettle always boils over.” She rolled her eyes.
She had every reason to. Truth be told, it wasn’t really a “kettle” at all. It was a cooking pot. In fact, it was the same pot I had made chicken noodle soup in a few nights before. I didn’t own a kettle. I didn’t own a mash tun, hot liquor tank, pumps, hoses with quick disconnects, or any other fancy equipment. And that was fine until I wanted to extend my brewing prowess with new techniques and styles. For me, this meant transitioning from extract to all-grain brewing. For my wife, it meant more eye rolling.
What is all this stuff? Upon returning one day from Morebeer, this was the question I faced from my wife. I began to explain:
Crushed grain and heated water are combined in the mash tun and held for a period of time. During this time, enzymes in the mash transform complex starches in the grain to more simplified sugars. When the mash is complete, the liquid, now known as wort, is emptied out of the mash tun into the boil kettle.
Mash tuns come in many different forms. I use the SS Brewtech Infusion mash tun, which is a stainless steel, insulated vessel with a screen and a bottom drain. It helps me hold consistent mash temperatures for about an hour before losing heat, and the bottom drain minimizes the amount of wort that would otherwise get left below the racking port. This mash tun can support step mashes, but it gets tricky since you cannot put this mash tun on a direct flame like you would be able to do with uninsulated stainless steel options. Other mash tun options include modified water coolers, ice chests, kegs and more.
This is simply a vessel to hold hot water. Chalk this up as a nice-to-have. In my system, I heat all my water in the boil kettle to start. I then transfer a portion of the water to the mash tun (at the appropriate strike temperature) and the other portion (my sparge water) to an old water cooler - which I call my HLT. Other systems have dedicated HLT’s connected to a heat source. Either way, they are simply a hot water holding tank.
A big pot. Think turkey fryer big, or bigger. That said, there are some features that make some boil kettles better than others. First, volume etchings. Brewing all-grain batches is a lot easier if you can accurately measure volumes (gallons or liters). Next, ports. My kettle has a racking port to move the wort out to the fermenter, a tangential port to perform a whirlpool, and a third port where I usually connect a temperature gauge. These all either make things safer or more convenient. And I can’t stress safety enough. You’ll be working around 10-20 gallons (or more) of boiling hot liquids. Your kettle should be stable and in control at all times. My kettle also happens to have rubber coated handles, which have saved my hands from a serious burn numerous times.
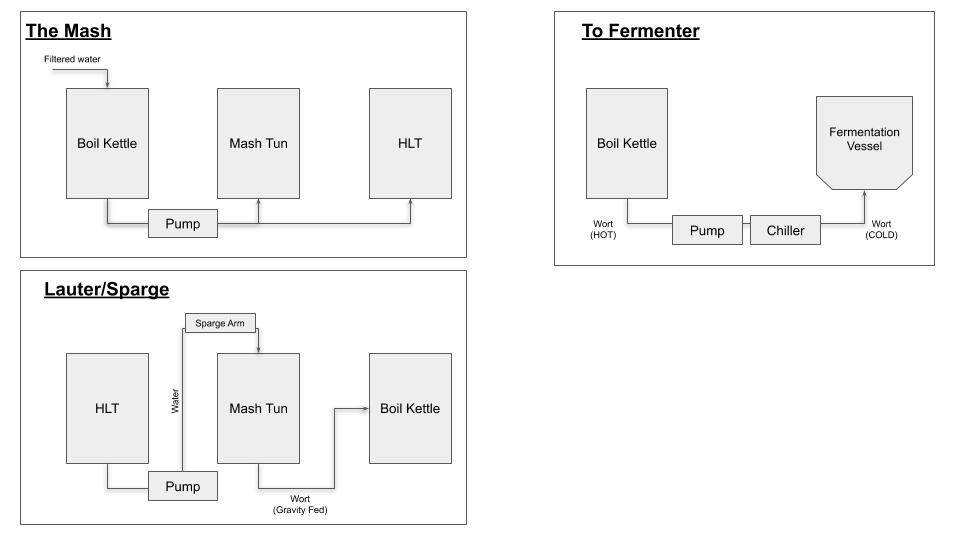
That covers the big three ticket items in an all-grain setup. Below is a diagram to help explain my all grain brew process flow. Next I’ll go through some of the accessory items that either make your life easier or just ratchet up the fun.
While it’s possible to operate an entirely gravity fed system, pumps and hoses make light work of transferring liquids around the home brewery. I never appreciated this fact until my pump broke in the middle of a brew day and I had to figure out a way to lift seven gallons of wort high enough to gravity feed into the fermenter. Not fun. Although slightly more expensive, consider investing in a pump with a stainless steel head. They handle heat better than plastic, and the threads on the connections are less likely to strip. Also, consider adding quick disconnects to all your valves and hoses. Without them, it’s too tempting to skip the step of clamping the hose to the output on your valve. This exponentially increases the risk of a hose popping off in the middle of a transfer, spewing hot wort everywhere. For a few extra bucks, quick disconnects greatly reduce this risk and make moving hoses around a cinch.
This little piece of equipment, honestly, just makes me feel more like a brewer than I am. When sparging, you’re rinsing the grain in the mash tun with water in an attempt to get every last bit of sugar out of the tun and into the kettle. The sparge arm is a nifty way to sprinkle hot water (from the HLT) over the grain as you lauter (move the wort from the mash tun to the kettle). It’s about efficiency and may yield you a few extra gravity points in the kettle when compared to batch sparging methods that require no extra equipment. There’s also a no sparge method where you basically just bump up the amount of grain in the recipe to compensate for the gravity point loss due to no rinsing of the grains at all. This is pretty economical at the homebrew scale given an extra pound or two of grain equates to just a few extra dollars per batch.
This is another nice-to-have since most homebrew shops will mill your grains for you. That said, having your own mill gives you more control over the crush and gives you the option to buy grain in bulk to mill on demand. For more on selecting a mill, check out [this article].
Next to knowing your volumes, knowing your temperatures is also critical to all-grain brewing. Some mash tuns come with built-in thermometers, but if your’s does not, buy one separately. Even if your mash tun comes with a thermometer, do your best to calibrate it accurately.
And then there’s the things you probably already have from your extract brewing days: a mash paddle, chiller and fermentation vessel - maybe even some fun stuff like hop spiders, hop rockets, water filters, etc. All of that equipment is usable in the all-grain brewer’s system.
Admittedly, my wife was right to roll her eyes at all this stuff when I brought it home. It’s a lot of equipment. And the best way I describe my approach for putting it all together is by calling it the duct tape approach. I’d venture to guess that a majority of us end up here. We start with a simple pot and end up a few years later with a dog-eared wort stained copy of “
How To Brew” and a conglomeration of kettles, pumps, Gatorade coolers and a selection of other trinkets we’ve duct taped together for a brew system. Not that there’s anything wrong with that. On the downside, it can be time-consuming to make each piece compatible with the other or to haul out several individual vessels on brew day. But think of the upside. For one, it’s a flexible system that allows you to brew pretty much any style of beer. It’s also cost effective in that you can add-on to the system as you go and, if something breaks, you only need to replace that specific part. It allows you to pull from the best of each manufacturer, or maybe not even buy from traditional manufacturers at all. Many homebrewers are excellent engineers, recyclers, and creators, turning everything from restaurant supplies to old worn out kegs into brewing systems. Really anything goes.
For those wanting a more turnkey approach, several all-in-one systems are on the market in which you can mash, sparge and boil in one single vessel. While you could include direct-fired brew-in-a-bag systems here, most of the options in this category are electric and include those in the 115V and 240V power range. The pros on these systems are many: the convenience of a single vessel (less to clean!), easily controlled mash temperatures and the absence of an open flame makes them suitable for indoor brewing (with appropriate ventilation). These systems are also great for impromptu brew days and experimentation. On the downside, the electrical components can be limiting in a couple of ways. First, not everyone’s brew-shed is wired for 240V and 30 or 40 amp circuits. Having these installed can be costly. Second, in some cases the 115V systems struggle to produce a roiling boil. Some may say that doesn’t matter, but if you think it does, be warned. It’s also generally going to be the case that if part of the system breaks down, the whole system is out of commission. The kettle can’t be separated and used over a burner, for example. If you’re up for this risk, the reward should be some quick and fun brew days with excellent results.
And finally, do you want the ultimate control over your brew day? Do you want your system to look as good (or even better) than your beer tastes? Brew sculptures are your answer. These are high-end systems for the serious homebrewer. They take all of the equipment discussed above and integrate them into a single cohesive system that gives the brewer control over every step in the brewing process. These systems are advanced enough to be pilot systems for professional brewers. The downside? They are costly for sure, and fixing a broken part may require some expert help. But at the end of the day, these are beautiful setups that most of us dream of having...someday…
As for now, I’ll continue to brew on my duct tape system. It works for me and that’s what’s important. Now, back to that chicken noodle soup IPA.
All contents copyright 2024 by MoreFlavor Inc. All rights reserved. No part of this document or the related files may be reproduced or transmitted in any form, by any means (electronic, photocopying, recording, or otherwise) without the prior written permission of the publisher.


.png)
.png)
(1).png)
.png)

