by Jim Martella and Paul Gatza (Brewing Techniques)

Whether you’re a professional brewer with a snazzy brewhouse or a home brewer with a rag-tag system, you depend greatly on temperature and gravity readings provided by a couple of simple instruments. Perhaps it’s time to review your arsenal of tools to see how they measure up.
Professional brewers, despite all the expensive equipment at their disposal, still have a couple of basic instruments in common with home brewers — the thermometer and the hydrometer. All brewers who share the goals of making high-quality, consistent, or simply properly designed beer rely on these simple measuring devices to evaluate critical points during the brewing process.
At minimum, thermometers tell you when the wort is cool enough to pitch yeast, and hydrometers can indicate the progress of fermentations. As brewing procedures become more sophisticated, so do the tools used. Mashing, for example, requires very specific temperatures to activate malt enzymes. Hydrometer readings, meanwhile, allow brewers to determine that their starting and final gravities are consistent with their recipe and enable them to calculate their extract rate, brewhouse efficiency, and final alcohol content. The importance of these readings cannot be underestimated; unfortunately, it often is.
I learned my own lesson only after several years of brewing. I began extract brewing almost eight years ago with an equipment kit that, like most kits, included a basic hydrometer and thermometer. It took a while, however, for me to realize that I wasn’t using either instrument to its full advantage. It wasn’t until I performed my first step infusion mash that I fully realized that making beer according to its true recipe involved using both instruments properly from the beginning of the brew to the end of fermentation.
I was destined to learn even more when my home brewer’s dream turned to reality over three years ago and I was hired to brew at a small, technically unsophisticated microbrewery in Colorado. Like many other new microbrewery entrepreneurs at that time, the owners and I came straight out of home brewing and had no professional brewing experience or training.
As time passed and the company grew, the employees became more experienced and sophisticated. One of the lessons we learned was that we could no longer rely on economy instruments from the local homebrew supply store. Variety may have been fun and even desirable when we were home brewers; going pro required higher standards for quality and consistency, and we were finding it hard to achieve our goals with the tools at hand.
When unexplained, radical changes in extraction rates occurred from batch to batch of the same recipe, we were stumped. At first, we attributed the changes to differences between malts and specific lots of malts, so we simply added more malt to the next mash to bring the initial extraction closer to the normal original gravities associated with the first runnings. No one ever stopped to consider that the changes might have been associated with the instruments.
In the end, a new hydrometer solved our problems. Our revelation may sound obvious, but to us it was critical: These instruments are fragile; glass may crack, scales may slip. Not only that, they’re not all built alike, and even hydrometers from the same manufacturer can give different readings.
When we stumbled onto the idea that the instruments might be at fault, we decided to test our new hypothesis with some new hydrometers and thermometers. A simple comparison of readings between our old standard homebrew hydrometer and a higher end hydrometer revealed shocking results. The difference was as much as 10 gravity points in some circumstances! I experimented with different brands and even with models from the same manufacturer — all with varying degrees of error. How could we possibly gauge our brewing techniques with inaccurate readings? We came to understand that if we tried to make a consistent commercial product using a standard home brewing hydrometer or thermometer (that is, an instrument not intended for commercial use), we might as well try to bottle the beer upside down.
.jpg)
Click here to browse our selection of hydrometers!
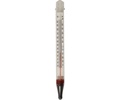
Hydrometers are simple devices that compare the density, or more accurately, the specific gravity, of the liquid being measured to that of distilled water. They are generally made of glass with a slender stem at the top and a wider bulbous section weighted at the bottom.* A sample (wort or beer) is poured into a vertical cylinder, and the hydrometer is inserted and allowed to float in the solution. The depth at which it floats provides the specific gravity, which is read directly from a scale in the stem.
The identical instrument is called a saccharometer when it is equipped with a Balling or Brix (the more recent, corrected form of Balling) scale for measuring the specific gravity in terms of the sugar concentration of the liquid.†
†Balling is primarily used by the wine industry; Brix is most commonly used in the food industry. Both measure the concentration of sugar in solution. To measure the specific gravity of a sugar solution with the most accuracy, you will need a refractometer, a prism, and a scale; a complete set-up would cost between $100 and $200.
The calibration standard: Distilled water, the standard against which all hydrometers are calibrated, has a specific gravity (S.G.) of 1.000. Specific gravity, however, is affected by atmospheric pressure and temperature. The base reading of 1.000 for distilled water assumes the reading is taken at mean sea level and at a temperature of 60 °F (16 °C). Any hydrometer can give misleading readings if the user fails to account for the temperature and pressure at which it is being used. Many hydrometers come with temperature correction scales; it is important to use them.
All instruments fall within one of two classes of measuring standards. Instruments designed solely for approximation purposes are referred to as secondary standard instruments; your supermarket’s produce scale and the average home brewing hydrometer are two examples. Secondary standard equipment is less rigorously tested and is, as a consequence, less reliably accurate. Properly calibrated amateur instruments of this sort are scarce but do exist. Primary standard instruments are much more accurate and are accompanied by a certificate of traceability that documents that they have been calibrated against an instrument certified by the National Institute of Standards and Technology (NIST), formerly the National Bureau of Standards. Primary standard instruments are more expensive, but worth every penny.
*The international temperature standard for calibrating specific gravity (and those measured in units of Plato, Brix, and Balling) is now 68 °F (20 °C), although many older hydrometers as well as some instruments manufactured currently are calibrated at 60 °F (16 °C) and a few are calibrated at 58 °F (15.56 °C).
Hydrometer prices can range from $7 for general-purpose models all the way up to over $ 200 for hydrometers that measure very specific ranges. Certified traceable hydrometers can be found for under $20 apiece; most brewers will find these instruments perfectly adequate. This section reviews the variety of hydrometer types and variations on the market.
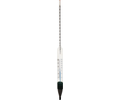
Narrow-range hydrometers: One difference in the high-end models is that they typically have scales that cover a narrow specific gravity range. A set of two hydrometers designed for brewers may include one that measures worts with original gravities above 1.049 (12.1 °P) and another that measures gravities less than 1.050 (12.4 °P). One manufacturer sells a narrow-range instrument scaled to measure only final gravity. Its scale, therefore, covers only the lower quarter of the specific gravity range. Fancier hydrometers may be available in still narrower scales for even more accuracy — probably more than is really necessary in a brewery.
My experience confirms, though, that a narrow-range scale is more accurate than a broad-range scale. The low- and high-end hydrometers I tested all registered a 1.000 specific gravity reading sitting in water at 60 °F (16 °C), so even inexpensive instruments appear to be accurately standardized to work at 1.000 S.G. The deviations between instruments grew, however, as the gravity of the test liquid increased. I found that at gravities of around 1.050 S.G., the low-end instruments registered readings that were off by about 7 points, and worts of about 1.084 S.G. (20.1 °P) came in about 8–10 points higher than they should have been. That’s enough to throw a monkey wrench into even a less discriminating home brewer’s beer.
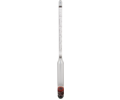
Triple-scale hydrometers: These hydrometers measure potential specific gravity, alcohol content, and Balling or Brix all in one. Any instrument that has three scales in one, as do many of the low-end models, has the potential to be imprecise and difficult to read. This configuration also runs counter to NIST’s explicit recommendation that hydrometers have no more than one scale. Furthermore, the scales on these hydrometers are often expressed in increments as much as four times larger than those usually found on certified hydrometers. Some inexpensive hydrometers are even scaled in 10-point increments!
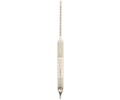
Combined-form hydrometers: Combined-form, or “thermo-hydrometers,” minimize the effect temperature fluctuations have on readings by incorporating a thermometer within the body or stem of the hydrometer. Most also come with tables to help you correct the reading at temperatures other than 60 °F (16 °C), and correction tables exist in many popular brewing books, although according to NIST, these corrections may be correct for only a limited portion of the hydrometer scale. As with most instruments, readings are most accurate when taken at the intended temperature.
Questions of calibration: Accuracy can vary greatly between instruments and from manufacturer to manufacturer. One way of evaluating an instrument’s accuracy is by examining the way in which it was calibrated. With hydrometers (which can’t be physically adjusted once they leave the manufacturer), calibration means standardizing the hydrometer by determining its deviation from standard values so as to figure correction factors.
Don’t be afraid to ask your supplier if and how an instrument was calibrated. The easiest way to calibrate, of course, is to set the hydrometer in some 60 °F, adjusted-for-sea-level, distilled water, de-gas it by twirling, and see how close the reading comes to 1.000. If it reads 1.002, for example, 0.002 becomes your correction factor for use with all future readings. This is the method most often used for lower-end instruments.
My findings, however, make me skeptical that this kind of calibration can be acceptable for all levels of the scale. I have found in my experiments that both homebrew hydrometers and certified traceable hydrometers read exactly the same in water at 60 °F (16 °C). Homebrew hydrometers may have more problems with accuracy, however, because they are not calibrated to adjust to different points on the specific gravity scale as gravity increases. At least one North American manufacturer routinely checks hobby instruments for accuracy at three different points on the scale; this is something to look for when shopping for instruments.
The wobble test: You can perform a simple test in the store that will quickly indicate a problem instrument. Lay the hydrometer flat on a tabletop and roll it. Observe the stem (as compared to the bulb): Does it wobble like the bent cue stick at your local billiard hall? If it does, that’s probably a sure sign that it’s not a well-made hydrometer and that your readings will be suspect.
.jpg)
Check the paper scale: Be sure to inspect the paper scale inside the hydrometer. These are often glued in place, but the glue may be tenuous and the paper containing the scale may slip, thus automatically giving false readings. Higher end hydrometers are designed to keep the paper from shifting.
Weighting: Hydrometers are most commonly weighted with either a solid lump of lead or with lead shot, although mercury is also listed by the American Society for Testing and Materials (ASTM) as a possible ballast. If lead shot is used, be sure that it is secured to the bulb by wax, glue, or a cap of melted lead. The ASTM specifies that there should be no loose material of any sort inside a hydrometer. The glues and waxes typically used to cement lead shot have a boiling temperature above that of wort and should not melt or deteriorate during brewing applications.
Hydrometer size: NIST recommends a 14-in. hydrometer; shorter hydrometers may not be as accurate because the increments of the scale are spaced more closely together (to fit the stem) and become very tricky to read correctly. (Unfortunately, the longer the hydrometer, the longer must be the test cylinder, which means that more wort or beer will be discarded after each reading.)
No matter how much you spend or how advanced the instrument you buy, your readings will be compromised unless you use good technique. Here are some tips to give you the best results from whatever hydrometer you use.
Use the right hydrometer test cylinder: A correctly sized cylinder should allow 12.5 mm (½ in.) of horizontal play on each side of the instrument and 25 mm (1 in.) of vertical play. In other words, your hydrometer needs room to bob and float without touching the sides or bottom of the test cylinder; this space gives the hydrometer room to settle and prevents surface tension from affecting readings.
Take temperature into account: All the hydrometers I’ve seen in the brewing industry are calibrated to measure correctly at 60 °F (16 °C). Mix the sample to be measured with a top-to-bottom motion to achieve a consistent liquid temperature. It’s best to let the sample cool to 60 °F (be patient when testing the temperature of the sample) before taking the reading and to let the hydrometer sit in the liquid for a couple of minutes to allow it to adjust to the temperature before you record your numbers. Note that your room temperature may be different from the temperature of your sample. Deviations from the standard temperature can be accounted for with a correction scale (if the hydrometer comes with one) or with one of the temperature correction charts published in popular brewing literature.
When calibrating an instrument against another, place both in the same test cylinder to eliminate temperature variability between the two readings. Combined-form hydrometers were developed to avoid temperature errors (see previous section, “Surveying the Hydrometer Marketplace”).
Measure without bubbles: Try to avoid reading the scale when bubbles are attached to the side of the hydrometer. These gases will lift the hydrometer and give false readings. It helps to twirl the instrument until all the foam in the tube subsides. The centrifugal forces will disperse the gases long enough to take a reading. Lower the hydrometer slowly into the sample, just below the level where it floats naturally. Then let it float freely and take the reading.
Read it right: Directions will vary between instruments — be sure to read the instructions that come with yours. Most readings are taken at the top of the meniscus of the liquid (the meniscus is the crescent-shaped curve of liquid riding up the inside of the stem of the testing cylinder). If you started with a dry cylinder, as is recommended, then the meniscus will appear convex. Take your reading by sighting straight across the surface of the liquid to the point at which the liquid “cuts” the hydrometer scale. The most important thing to remember when taking a reading is to be consistent. If you always take readings the wrong way — that is, at the dip or crest of the curve — you will still get consistent readings, though yours will vary slightly from someone who always sights straight across the surface of the liquid.
Keep it clean: Always, always, always use a clean and dry hydrometer and testing cylinder. Hydrometers can be cleaned with ethyl alcohol just before use. The testing cylinder can be cleaned overnight with a light caustic solution or soda ash. And don’t forget that you must discard your sample after you’ve taken the reading, even if the hydrometer has been sanitized.
Thermometers, those other old stand-by instruments, are available in an even wider range of models for various applications. Thermometers can be made of metal or glass and can operate by sensors, by the bend of two bonded metals, or by some kind of liquid filling — usually liquid mercury or ethyl alcohol (a food-grade material suitable for use in brewing that is colored with red dye).
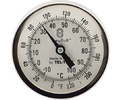
Bi-metal thermometers are generally faster, easier to read, and more durable. They are relatively simple devices that rely on the expansion and contraction of two bonded metal strips within the stem to detect temperature changes; the strips are made of distinct materials that react to temperatures differently: as they bend, they curve, which activates a dial at the end of the thermometer. Make sure the temperature range and the level of accuracy specified are adequate for your needs (for instance, is a scale with 2 degree units too large?). Some metal thermometers have a calibration nut so you can reset the thermometer with a pair of pliers if needed.
Thermometers for home brewers: Home brewers are likely to have one or more of the following instruments on hand for different purposes: floating thermometers, a type of liquid-in-glass thermometer that may have a loop on top for checking carboy temperatures; dial or digital thermometers with stainless stems; or adhesive thermometer strips designed to be attached to the outside of fermentors. Most U.S. thermometers are designed for partial immersion (the bulb and part of the stem only are submerged). Many metal or dial thermometers have clips to allow easy attachment to a brewpot.
Floating thermometers (originally called “dairy thermometers” because they were used in dairies to check milk) are good for leaving in a mash tun or kettle to measure boiling temperatures. The downside is that they are most commonly made with thin glass that can crack easily, especially when subjected to large and sudden temperature changes; if you’re using one, make sure it is filled with a food-grade material (ethyl alcohol) and not mercury. (It is never recommended to use any mercury thermometer in direct contact with beer.) Floating thermometers also are generally slower to react because heat must pass through a double layer of glass and air before it can affect the filling. They are therefore not as good a choice for step mashes as are metal dial thermometers.
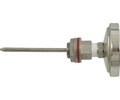
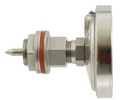
Metal dial thermometers with stems (often 12 in.) are good, general-purpose thermometers. They give quick readings and are sturdier than glass thermometers, which makes them good for the mash tun or inserted into piping for in-line brewing (if they come with threads). Some can also be easily calibrated using a screw on the back. They can be mounted on a keg modified for use as a kettle or mash tun. They are also often used as sparge water indicators.
Digital thermometers cost twice as much as regular dial thermometers, but the LCD readout is extremely fast and easy to read. The only problem is that steam or high heat can sometimes cause the numbers to change into some type of alien hieroglyphics and take minutes to stabilize. Pocket thermometers can be good for spot checks.
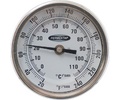
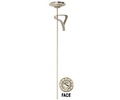
More and more thermometers designed specifically for home brewers are coming onto the market. One that I’ve seen is bimetal with a 3-in. dial and a 4-in. probe that is excellent for use with ½-bbl kegs converted for home brewing use. The dial size makes it very easy to read, and the 4-in. probe may be all that is needed. It’s especially handy because key temperature ranges for brewers are color-coded for easy readings; for example, the classic acid rest temperature of 95 °F (35 °C) is in yellow, the common protein rest temperature of 122 °F (50 °C) is in red, and the starch conversion range is shown in blue. This one has high-temperature gaskets that don’t leak; other instruments may need special adaptors that have to be welded to the tank.
An adhesive thermometer is specifically designed to monitor fermentation, storage, or serving temperatures in a range from 36 to 78 °F (2 to 26 °C). It sticks easily to a clean surface such as a carboy or a plastic or stainless fermentor, allowing the brewer to avoid opening the carboy and exposing its contents to potential contamination or aeration. Adhesive thermometers, however, may be difficult to read.
Calibrating your own instruments: Glass–mercury thermometers, though not themselves safe to use for taking readings, are great for calibrating other instruments. One technique especially useful for home brewers might be to compare readings at, say, 100 °F (38 °C), to those of a standard fever thermometer (designed to be incredibly accurate in this range).
Thermometers for the pros: Professional brewers, as captains of bigger vessels and heavier production, generally have higher standards for their thermometers. Temperature control is key in nearly every aspect of brewing. Thermometers are everywhere and serve vital roles — thermometers for the mash tun, the sparge water, the kettle, the wort chiller; thermometers for the fermenting vessels, the bright tanks, the hot liquor tanks, the keg cleaners, and the CO2 tester; partial immersion thermometers to measure wort samples; and thermometers in the cold rooms and glycol systems. Imagine the floating thermometer for the mash tun is four degrees off or the sparge water temperature reading is six degrees high, or that the temperature on the bright tank is two degrees off. Inaccuracies like these can add up to big problems in the long run when it comes to product consistency.
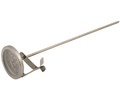
At my brewery, we finally switched from the floating glass thermometer (that could break at the slightest nudge) to a floating stainless device with a long probe for the mash tun. I find it surprising that many brewing systems — mash tuns in particular — destined for the micro or pub scene do not come equipped with some kind of thermometer. I know of at least one company that has started to supply hand-held digital thermometers with its systems. These devices come with a 4-ft probe and are reportedly quick to respond and are accurate to 0.1 °F (0.056 °C), allowing for the easy identification of cold spots in the mash tun.
Mercury thermometers are fairly expensive, but, as mentioned earlier, they are good for calibrating other thermometers because of their accuracy. They can also be purchased with traceable certification for $140 to $200 each. They come with various immersion requirements: partial, total, or complete.
Partial immersion thermometers are the most versatile because they require immersion of only a portion of the bulb (though readings will be accurate only when submerged to a specified depth). They are the most common type of liquid-in-glass thermometer found in the United States.
Total immersion thermometers work only when the bulb and all but about a half-inch of the liquid column portion of the stem are exposed to the liquid being measured.
Complete immersion thermometers require that the entire thermometer, including the expansion chamber at the top, be subjected to the temperature being measured. Thermometers in the United States are generally not designed to be used at complete immersion.
Accuracy: Just as with hydrometers, you may find that using two thermometers with different ranges can give more accurate readings. At the brewery where I worked, we had one thermometer filled with mercury for liquids from 90 to 180 °F (32 to 82 °C) and another for liquids from 32 to 70 °F (0 to 21 °C). We used these thermometers to calibrate dial thermometers according to what or where in the brewing process they were being used.
Keep your brewing temperatures accurate, click here to browse our best-selling brewing thermometers!
Sometimes the simple devices that we rely on every day are the ones most often taken for granted. All brewers, whether professionals or home hobbyists, have to decide what level of accuracy they wish to achieve and what price they’re willing to pay for that accuracy (the additional cost may not be much). Yet even the best of instruments can yield the wrong readings if they are not used in the way they were intended. Know the limits and strengths of your tools, and your craftmanship will improve correspondingly.
All contents copyright 2024 by MoreFlavor Inc. All rights reserved. No part of this document or the related files may be reproduced or transmitted in any form, by any means (electronic, photocopying, recording, or otherwise) without the prior written permission of the publisher.


.png)
.png)
(1).png)
.png)