Equipment List
Click on the following to order from these pieces from MoreBeer.Com
1) 5lb CO2 Tank (D1050)
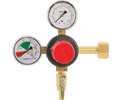
2) Dual Gauge Regulator (D1060)
3) 3’ Gas Line (D1704)
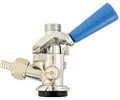
4) Sanke Style Tap (D1505)
5) Beer Line (D1700)
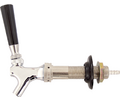
6) Faucet/Shank/Knob Assembly (D1255)
7) Stainless Steel Drip Tray (D1400)
8) Used Refrigerator (best to look on Craigs List or local classifieds)
Note: You can buy the above equipment in a complete kit with directions as our D1000 Deluxe Kegerator Conversion Kit
Directions for Installation
While designed for our equipment these directions will essentially be the same even if you are piecing together a system.
A) Secure a tall glass of beer as this can be a thirsty job. This will be the last time you have to pour from a can or a glass. Beer on tap is moments away.
1) The first step is to decide where you want the faucet to be on the outside of the refrigerator. Mark the spot and then drill a 1” hole. You will need a 1” hole saw bit and a very sturdy drill. This is the only hard part of the installation.
2) Take the back nut off of the threaded shank and push the shank into the hole you just drilled, so that the flange (usually black) is flush with the outside of the refrigerator. Screw the back nut onto the back of the shank, from inside the refrigerator, so that the shank is firmly secured.
3) Screw in two sheet metal screws where you want the drip pan to hang. The screws that are included with the kit are self-tapping and can be put in directly with an electric screw gun. Otherwise, you will first need to drill two pilot holes. It is a good idea to try and get this as even as possible. Measure two contact lengths from the top of the refrigerator and then draw a line between the two. Hold the drip pan up to the line and mark the screw holes with a pen or pencil. (Tip: consider the height of a pint glass)
4) Install the bright, shiny new faucet onto the shank if you have not already done so. Take a step back and soak in the vision, the outside is complete.
5) Connect your dual gauge regulator to the 5lb CO2 tank with a crescent wrench. The built in gasket is enough if the regulator is properly tightened (do not over tighten or you will split the o-ring). The gauge that goes to 2000 lbs p.s.i. is your tank gauge and tells you how much gas is left in your tank. A normal 5lb CO2 tank will hold from 800-1000lbs p.s.i. of pressure when filled, depending on temperature. The guage that goes to 60 p.s.i. is your outgoing guage and tells you what amount of pressure is being released into the keg.
6) The tap line coming out of the top is the beer line, a 3/16” I.D. clear line. The line coming out of the side is the CO2 line, 5/16” I.D. clear line. Clear gas line is good...you can see if anything is in it.
7) Attach the CO2 line to the dual guage CO2 regulator. Attach the beer line to the nipple on the back of the shank (the same shank you previously installed through the refrigerator.)
8) After everything is connected you will need to slowly open the valve on the topof the CO2 tank. Open the valve on the outlet of the regulator by turning the valve to the vertical postion. If you hear any leaking shut it off and inspect the gas line clamps and fitting on the regulator and tap. If you do not hear any leaks then you can adjust the pressure on the regulator. Usually 8-12 lbs p.s.i. is considered a norm, but different beers might have different requirements. You can increase the outgoing pressure by screwing in the adjustment screw on the regulator body. In reverse, by loosening the screw, you decrease the pressure.
9) With the pressure on, we are ready to tap the keg . Place the tap on top of the keg and twist the entire tap body clockwise. Then twist the black handle clockwise. Your beer is tapped. You are a kegerator builder. Run, don’t walk, to the nearest pint glass and test the system out.
After note: Your sanke tap is the choice for about 90% of the keg beers on the market. If you decide to tap a European, German, or English keg you will most likely need to purchase the corresponding tap.
All contents copyright 2024 by MoreFlavor Inc. All rights reserved. No part of this document or the related files may be reproduced or transmitted in any form, by any means (electronic, photocopying, recording, or otherwise) without the prior written permission of the publisher.


.png)
.png)
(1).png)
.png)